Showing posts with label sweet. Show all posts

Wednesday, 19 August 2015

The Honey & Co. Baking Book - Rose and Strawberry Jam

Today's post is going to be a Honey&Co. related post, and in that vein it should lead in with a Honey&Co. related announcement.

Sarit and Itamar read the babka post guys. And they loved it. Sarit loves the blog. She thinks I'm 'so sweet and enthusiastic and full of love'.Yes, I am still reeling from that happening. It was such an uplifting, positive, wonderful e-mail to come home to after work that I didn't stop smiling for days after. While they did ask that I not share the recipes (since they're copyrighted to Saltyard Books), they loved that I'm planning to give the book a good testing. I really can't think of any other way to thank them for such a mid-week boost. So today, we're going to talk about jam making.

I promise they were redder than that. Damn night time photography.

But first! Let me tell you about my relationship with strawberries.

Strawberries back home are on the expensive side. They cost five times more what they cost in the UK and don't taste...well...they just don't taste of anything really. They don't smell of anything either. I ate them purely because they were exotic...but secretly would crave mangoes while trying to swallow their sour red juices. In a world of papayas, mangoes and a smorgasbord of bananas, strawberries emerge as the 'exotic fruit' redolent of pale skinned, golden haired strangers in lands far away. But in comparison to the juicy longans you could get at the market for a fraction of the price, they seemed a little...blah.

This summer, things changed. The first time I tasted a summer strawberry my world exploded. Color became sound, sound became color the sky split and fireworks went off behind my eyes.  Ok, none of those things happened. But let me tell you it was pretty damn close. Finally. THIS was what all the fuss was about. I got it now. All the hype made sense.

I have spent the past two months gorging on strawberries. These big, juicy rubies have stained my lips and dribbled their juices down my chin and fingers on an almost daily basis. But ( as all good things) summer is coming to an end, and it's taking strawberries with it. In an attempt to bottle my British summer, I tried making the strawberry and rose jam from The Baking Book. Itamar did say at the book launch that if you try ANYTHING in this book, please please please make our jam.
And I can see why.

GUYS
This... I just.... I DIDN'T KNOW JAM COULD TASTE LIKE THIS.

I mean, ok. I have consumed many a jar of commercial jam (Hey Mrs. Bridges! Hello Bonne Maman! How's it going?) before. I have also consumed many home made strawberry jams, lovingly made in big pots by watchful home cooks. But see.... they always just tastes of...well...strawberries. And yes, that is what you ask for when you buy strawberry jam. But it's always just...strawberry. Good...straight up...strawberry.

This jam has ruined me. and the secret touch? Roses. They put rose petals and rose water into the jam. Just...just what? That sweet floral note just makes this jam. It gives your nose something else to concentrate on besides sugar cooked strawberries and rounds out the sweetness of the actual jam. But it's not cloying. There's just enough rose water to get things going.

 I want to bathe in this stuff. I want to smear it on my face. The perfume is unbelievable. My house smells divine. The kitchen and living room have been perfumed with strawberries and roses....this is what Valentine's Day should smell like.

That bubbled up to 3x it's original volume. It was intense.


Making jam is not for the faint of heart. That's not meant to turn you off. Do it. It'll put a little gumption in your soul. And really most of the jam making adventure is stress free, if not a little tedious. Be careful, hulling and preparing that much fruit may give you a sore wrist. Just go slow and take breaks. And read the recipe, the WHOLE recipe at least twice. I missed Sarit's jam making 101 at the beginning of the chapter and that made things a little hectic.  Imagine haphazardly stirring hot sugar and frantically reading how to test if your jam is cooked enough and then burning yourself and running to put plates in the freezer...just...just read the recipe ok? Read it twice. At least twice. You've been forewarned.

The really scary bit is when you start cooking the jam. Sarit insists on boiling at the highest heat possible which makes the mixture bubble up to over twice it's original volume. Play it safe and use the biggest, heaviest bottomed pot you have. And don't fill it to more than 1/2 full. Once you get over the fear of your jam bubbling over and catching on fire it all becomes quite fun. Nothing will make you feel more witchy than stirring a cauldron full of bubbling goo.

Bottled and ready to go!


And that's it! Divide into your sterilized bottles and let them sit on the counter overnight to make sure they seal properly. Spread over warm bread or save it for the winter months when the sun has gone down at 3p.m. and you need a reminder that it was ever there at all.

Friday, 12 September 2014

Chocolate Chunk Banana Bread...and the time I wanted a legit excuse to have chocolate for breakfast.


WHERE DID THE SEMESTER GO???
Seriously guys, this is ridiculous. I could've sworn I started second year just last week. How are we a month away from the summer holidays? How? This is outrageous. Unthinkable. WHAT EVEN?

It's times like these that really frighten me...cause so much has gone past and it really feels like I've barely accomplished anything. Well...maybe a few things. I'm slowly starting to branch out and figure out my own recipes for one thing. It's exciting and wonderful and quite the adventure I must say. Eventhough most times it's less about figuring out the right ingredient ratio and more about working around what I have left in my pantry.


This banana bread was something I've wanted to make for a while. It's very moist and full of rich bananana flavour. A lot of that will depend on how ripe your bananas are. You really need to let them go as spotty and black as you possibly can. Not like the ones in the first picture. I had to wait a couple of days for them to be really ready.  Overripe is the only way to go here. If they reach that perfect all-black stage but you haven't got time to turn them into banana bread, just bung them in the freezer, and defrost when you're ready.


Chocolate chunk banana bread.
- 2 large VERY ripe bananas
- 1 tsp honey
- 1/2 tsp vanilla
- 1/4 cup of 1 part vegetable oil and 1 part melted butter (I'm sorry, I know that sounds super weird but that's how it gets so moist without tasting oily)
- 1/4 cup yogurt
- 1 egg
- 1 cup flour
- 1/4tsp cinnamon
- 1/2 tsp baking soda
- 1/4 tsp salt
- 1/2 cup sugar
- 150g semi-sweet chocolate, cut up into chunks

+ Preheat oven to 180'C
+ Mash the bananas with the honey and vanilla. Beat in the yogurt, oil, butter and egg.


+ Shift in the flour, cinnamon, baking soda, salt, and sugar. Stir until just combined.
+ Stir chocolate chunks through batter.
+ Pour batter into well buttered loaf pan and bake for 50 minutes or until cake tester in center comes out clean.
+ Let cool in pan for 5 minutes, before turning out onto wire rack to cool completely.

Before we go, wanna see my beautiful Flavours of Malaysia profile picture?

Wanna know what Flavours of Malaysia is? Just click here!! -->

Friday, 2 May 2014

Sago Pudding with Strawberries and Coconut Cream...and the time I made dessert on the fly.


Revision week is upon us, and as usual all I can do is watch Anthony Bourdain wax lyrical about the food I have left behind. I really need to force myself to start thinking about Comp Phys and Psychology instead of Nirwana Maju banana leaf...but I'll just watch one more curry laksa video...just ONE more..

Anyways, before the sadness of revision week set in I had two lovely people come over for dinner. Ben and Jen helped me so much during Flavours of Malaysia and were such an integral part of the night. Problem is Flavours turned out to be a bigger success than we expected it to be, and because Ben and Jen were helping two of our volunteers by the time they got to the hall all the food was gone. That dinner was my way of saying thank you for being there every step of the way, especially when it came to bargaining for ingredients in Dundee.


I'd already decided on a chicken rendang and briyani for the main meal, but dessert was proving to be a challenge. Sago Gula Melaka would've been the perfect end to such a heavy meal, but I was a little low on the sago front. Making a cake would've been too involved, and also very heavy. It got to the point where I was almost resigned to sending them home without dessert when one of those beautiful flashes of inspiration hit me in the face. I had strawberries.

So, this Strawberry Sago dessert was born and by God did it go down well. Not too sweet and very refreshing it was almost a... Malaysian take of strawberries and cream if you will. To keep it nice and chilled we use frozen berries instead of ice cubes so the whole thing doesn't get watered down. It also adds a very nice texture, and if you use clear bowls you'll get to see the ruby red crumble peaking out between layers of smooth smooth coconut cream and sago. I have to say though, you could probably do this with any berries. The key to making this dessert lies in using pandan leaves. Without them the sago loses some sparkle and the coconut cream is not half as fragrant. Any Asian supermarket should carry them, or if you plan ahead, I'm fairly sure you can get them from Amazon.


Ben was nice enough to come by a little early to take all these beautiful photographs you see today. He and Jen came bearing a veggie and pork stir fry and some dim sum. And believe you me, we FEASTED.


Strawberry Sago
Serves 4

+ 1 punnet strawberries
+ 1/4 cup sago pearls (the small ones)
+ 1/2 can thick coconut milk (about 200ml)
+ 3 pandan leaves
+ 1/4 cup sugar
+ 1/4 cup water
+ The juice of 1/2 a lime
+ salt

~ Wash the strawberries and hull them. Choose 4 of the prettiest ones and set aside for garnishing. Cut the rest up into smaller pieces, wrap in foil and freeze for at least 2 hours. 


~ Wash the sago pearls and soak them for 30 minutes. Place in a saucepan with a pinch of salt, 2 knotted pandan leaves, and plenty of water, then boil till translucent. Strain, then pour into a lightly oiled container and place in the fridge to set and chill.

~ Don't forget to stir the can of coconut milk before pouring out! The really thick cream would have floated to the top and set. Pour the coconut milk into a saucepan with the remaining pandan leaf knotted up and a pinch of salt. Set on a low heat. Be careful here guys... coconut milk is very prone to separating on high heat. You want that in a rendang, but not a dessert. Heat the milk till steam starts to rise off the top, then immediately take off the heat and allow the pandan to really infuse it's scent and flavour. Pour into a jug, keep the pandan leaf in there and set in the fridge to really chill.

~ Melt the water and sugar together to make a simple syrup. When all the sugar has dissolved, take off the heat and squeeze in the fresh lime juice. You shouldn't add it at the beginning because lime juice can get bitter when it's been heated too high. Once again, when cool to touch place in the fridge to completely chill.


~ Now, when you're ready to serve take the strawberries out of the freezer and mince em' up in a food processor with a little bit of the lime syrup. Remove the pandan leaf from the coconut milk, and mix in your chilled sago. Layer the dessert up, starting with the frozen strawberry mixture, then the coconut-sago mix. You should have 4 layers, ending with a coconut-sago layer. Garnish with the strawberries you set aside earlier and a drizzle of the lime syrup. Serve up more on the side for those guests with a sweet tooth (I'm looking at you, Ben :p)

And that's that! Good luck for finals week everyone. Don't forget to treat yourself and be kind to your body. It'll be summer soon!!


Wednesday, 2 April 2014

Strawberry and Satsuma Fruit Butter...and the time I wanted to go back to Altnaharrie.


It's been a little over a week since I got back from Blenheim. Of course classes have picked up full swing, what with the exams being just over a month away. Flavours of Malaysia is coming up very soon as well, so everyone on the committee is getting ready to release some yummy Malaysian goodness over the town!! :3


Needless to say...the stress is building up a little. I find myself constantly in one of those there's-too-much-to-do-so-I'll-do-nothing-at-all type moods, and it doesn't help that I've just found the first 2 seasons of Ugly Betty on Netflix. Somebody give me a shock I need to get out from under my duvet and get my life back on track!!


Sometimes I find myself drifting back to Altnaharrie...long days  spent in that sun flooded conservatory...watching horses and pheasants in the field...strolling to the village co-op to pick up supplies for dinner (which led to a fair bit of improvising on my part, the co-op wasn't exactly well stocked) and most of all to the little kitchen. I spent a week of blissfully sunny days overlooking the garden cooking up little things with too much butter and not enough vegetables. This fruit butter was one of the first things I made there. It was made to fill a Victoria sponge, but there was soo much extra I had it with my granola and yogurt for the rest of the week. Lesley enjoyed it soo much that I made another batch before I left for her to have for brekkie too. :) It's one of those things you just throw together and let blip away on the stove while you have a long, leisurely breakfast. Simple, and delicious.


Altnaharrie Fruit Butter
- 200g strawberries
- 2 satsumas
- 2-3 Tbsp sugar ( I used Lesley's homemade vanilla sugar. Adjust according to how sweet your fruits are)

+ Wash, hull and cut your strawberries into halves. Peel the satsumas and cut off the whitish membrane that surrounds each segment. Try to conserve as much juice as possible while doing this.
+ Mix everything together in a medium saucepan and set on the lowest heat setting you can turn your stove to. Leave to cook, stirring occasionally for 45 minutes or until thick and jammy.
+ Allow to cool, then bottle up in a clean jar. Keep refrigerated. Goes great on yogurt, toast, pancakes and in sponge cakes.

Till next time! :)

Wednesday, 12 March 2014

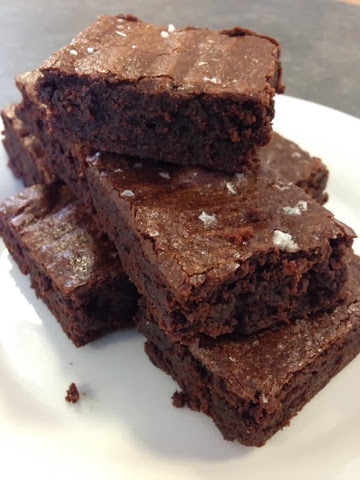
Alice Medrich's Cocoa Brownies


I'm really picky about my brownies. To me, a good brownie starts with the way it looks. Specifically that beautiful, crackly tissue paper crust. You know what I'm talking about right? That light, flaky top that all great brownies seem to have. Then when you bite into it, it shouldn't be cakey or gooey. No, a good brownie hits that golden sweet spot of FUDGY and it tastes of CHOCOLATE. Not a flat, vaguely cocoa-ish taste that disappears into a sugary abyss 2 seconds after you bite down. No. A superior brownie will punch you in the face with an intense, deep, dark chocolate high that'll swirl around your entire mouth till you basically see nothing but chocolate.


Having said that, I can't make a good brownie.
Don't get me wrong, I've tried over and over.
But brownies have always been a problem for me. I know they're supposed to be one of the first things you learn how to make, but I've never found a recipe that's been able to co-operate. Somehow it always ends up either dry or undercooked. Most times straight up burnt. NEVER with the Holy Grail of 'beautiful crust'. Maybe I'm being over-critical but I've just never been happy with how my brownies turn out.

So I'm still on my brownie quest. Maybe not quite with the determination and vengeance that I started off with, but I do try. It was on one of these brownie quirks that I tried making Alice Medrich's cocoa brownies. I've seen so much about them over the years online, but always passed them over as potential flops. I mean... a brownie recipe with no chocolate? Madness! Then one fateful evening a brownie craving arose and I didn't have any dark chocolate in my cupboard nor was I willing to walk 40 minutes to get some. I really wish now that moment had come sooner. Alice's brownies are brilliant. They've got that perfect fudgy texture and chocolatey flavour. I added a sprinkling of Maldon sea salt over the top and that did it for me. My only criticism was that I didn't get that crowning tissue paper crackle. Although, that could've been something I did wrong. Any ideas? Comment below if you know the secret to that beautiful top!


Alice Medrich's Cocoa Brownies

- 10 tablespoons (1 1/4 sticks) unsalted butter
- 1 1/4 cup sugar
- 3/4 cups plus 2 tablespoons unsweetened cocoa powder (natural or Dutch-process)
- 1/4 teaspoon salt
-1/2 teaspoon pure vanilla extract
- 2 cold large eggs
- 1/2 cup all-purpose flour
- 2/3 cups walnut or pecan pieces (optional)


+ Position a rack in the lower third of the oven and preheat the oven to 325°F. Line the bottom and sides of an 8-inch square baking pan with parchment paper or foil, leaving an overhang on two opposite sides.
+ Combine the butter, sugar, cocoa, and salt in a medium heatproof bowl and set the bowl in a wide skillet of barely simmering water (I just used the microwave. Blast for 30 seconds and stir. Repeat till smooth). Stir from time to time until the butter is melted and the mixture is smooth and hot enough that you want to remove your finger fairly quickly after dipping it in to test. Remove the bowl from the skillet and set aside briefly until the mixture is only warm, not hot.
+ Stir in the vanilla with a wooden spoon. Add the eggs one at a time, stirring vigorously after each one.
+ When the batter looks thick, shiny, and well blended, add the flour and stir until you cannot see it any longer, then beat vigorously for 40 strokes with the wooden spoon or a rubber spatula. Stir in the nuts, if using. Spread evenly in the lined pan.
+ Bake until a toothpick plunged into the center emerges slightly moist with batter, 20 to 25 minutes. Let cool completely on a rack. Lift up the ends of the parchment or foil liner, and transfer the brownies to a cutting board. Cut into 16 or 25 squares.

I'll leave you to bask in your chocolate comas. :p Till next time!

Monday, 30 December 2013

White Chocolate Apple Crumble...and the time I refused to believe 2014 was coming.


Seriously though, where DID 2013 go? It cannot have gone by so quickly. There must be something wrong with the laws of physics at play here. I absolutely POINT BLANK refuse to accept that it is only a matter of hours until we usher in 2014.

But if we must say goodbye to the year that barely begun, I am going to send it off in style. I wave adieu to 2013 with one of my new signature desserts, my take on apple crumble. I'm very very proud of this recipe. The apples are extra cinnamon-y and not too mushy, there's ALOT of crumble, and it's all very more-ish. But the thing that really pulls it together is the little bits of white chocolate nestled in the crumble. The chunks on top caramelize beautifully and give the whole thing a slightly nutty flavour, while the chunks underneath just ooze and meld the tender apples with the buttery topping.

Please try this, do. It's super simple, I promise!


White Chocolate Apple Crumble

Filling
~ 4 large granny smith apples; peeled, cored and sliced into small chunks.
~ 2 1/2 tsp ground cinnamon
~ 2 Tbsp brown sugar
~ 1 tsp honey
~1 1/2 Tbsp cornstarch

Crumble
~ 1/2 cup butter
~ 1 cup rolled oats, ground fine in a food processor.
~ 1/3 cup sugar
~ 1 cup flour
~ 1/2 cup cashew nuts, chopped up into wee chunks
~ 100g white chocolate, broken up into small chunks as well (you could use white chocolate chips)

You will need an ungreased 8x8 inch baking pan

+ Preheat your oven to 160'C.
+ Mix all the ingredients together for the filling and set aside while you get on with the crumble.
+ In a seperate bowl, rub the butter into the oats, flour and sugar. When it feels like damp sand, mix in the cashew and chocolate chunks.


+ spread your apple filling into the bottom of your baking pan and top with crumble. Like I said, there is ALOT of crumble. This is nice. This is GOOD.
+ Bake in preheated oven for 30 minutes, periodically turning the pan if it looks like the chocolate chunks are burning too quickly.
+ At the end of 30 minutes, take the pan out and cover it with tin foil. Pierce the top of the foil so that steam from the apples can escape.


+ Turn your oven up to 180'C and bake for a further 20 minutes.
+ Dish up with warm custard, or (my favourite) cold, cold, vanilla ice cream.

And on that sweet note, see you guys in 2014!


Thursday, 5 December 2013

Coconut 'Whipped Cream'...and the time I had hot chocolate weather.


The first snow of the semester came down on our little town about an hour ago. This picture was taken after it stopped, but before that we had big flakes of snow flying all over the place. It was almost like we were in a snow globe.  That's right. We've had our first episode of what I'd like to call Hot chocolate weather. 

Now I like my hot chocolate super dark with whipped cream on top. In Edinburgh I picked up this beauty:


And it is my favourite hot chocolate mix ever. Smooth, dark, and very very rich.

But what about the whipped cream? I didn't have any in the fridge.. So as usual I had to improvise with the stuff that I did have. The 'cream' I came up with isn't quite as thick or fluffy but it produces a nice smooth layer on your hot chocolate that smells faintly of coconut. Dairy free! For our lactose intolerant friends. :) 
It kinda feels like you're drinking a smooth, lighter version of a bounty bar. 
And if you can't find powdered coconut milk, maybe the top layer that forms in the can will work too... I don't know. If anyone does try that, let me know in the comments! :)


Coconut 'Whipped Cream'
- 1 Tbsp coconut milk powder
- 1/2 tsp icing sugar
- 2 tsp hot water


+ Mix everything in a microwaveable cup till smooth then microwave for 10 seconds on high. 
+ Stir again then pour over hot chocolate. 

Enjoy!

Sunday, 24 November 2013

Deepavali on the Causeway... and the time I was a good little Indian girl.


So last week the Malaysian society had a joint event with the Singaporean society! We had a very, very, VERY, belated Deepavali pot luck.


There was SO much food OMG. The tables were just groaning under the weight of all the dishes everyone brought along. To put things in perspective? My friend Siti roasted a MASSIVE chicken. I really wish I had gotten a photo of it sitting on the table in all it's roasted glory. And Siti's roast chicken is the most amazing thing you will ever have the privileged to taste. I was an EXTREMELY happy camper. :p

In between all the eating, we set out a couple of things for people to do. There was the Rangoli station, where people could come and spread some sand to colour in our Uni crest.
I think it's safe to say they got really into it.


It's a beauty, isn't it? SO proud of all the people who pitched in!


For my bit, I wanted to contribute some sweets (cause let's face it, it's not Deepavali without sweets!) so I got Aishah to come over, and she, Elisa and I spent our Friday night making these beauties:


Kesari
(sweet polenta cooked in milk and ghee with cashews and raisins)


Gulab Jamun
(Mini doughnuts deep fried in ghee then soaked in a cardamom syrup)


Badam Burfi
(Almond fudge, spiced with cardamom)

The Kesari and Gulab Jamun were made from packets I brought from home. The Burfi though? I made that from scratch. It's a sweet I started making last year when I spent my first Deepavali in Scotland, and continued to make for my family when I got home. Please try making it. It is the SIMPLEST thing. The only catch is you'll have to keep stirring for 45 minutes. Make it a bonding thing! Make your friends and family help stir too! Tell them your collective labour love will make the sweets taste better! 
And let's get real, that's probably true :)


Badam Burfi
~ 300g Ground Almonds
~ 1 and 1/2 cups Milk
~ 1 cup water
~ 1/3 cup sugar
~ 400g Condensed Milk
~ 2tsp Ground Cardamom
~ 1/2 cup ghee
~ yellow food colouring

~chopped pistachios and cashews to garnish

+ Ghee up a 9x13 inch baking pan.

+ Mix the almonds, milk, water, sugar, condensed milk and cardamom in a heavy bottomed saucepan. Stir continuously over a low flame. You don't have to be vigorous about this, just keep the mixture moving so it doesn't stick.

+ You'll be stirring this for a LONG time. No joke. But it'll be fun! I promise. :)

+ After about 1/2 an hour of stirring the mixture would have reduced to quite a thick paste. It may even be spitting a little. (Please be careful. No kids or pets running around the kitchen, thank you) At this point, start stirring in the ghee a dollop at a time. Allow it to incorporate into the mixture before stirring in more.

+ Keep stirring. Make pouty faces at your significant other so they'll take over stirring.

+Seriously though, that's it. Just stir over a low flame until the paste is really thick. It should be coming away from the sides of the saucepan. To test if it's ready, wet your finger and touch the surface of the paste. If it doesn't stick, it's done.

+Spread into your greased baking tray and sprinkle with the chopped nuts*. Allow to cool. Cut into bite sized pieces (as you can guess, these are very, very rich). 

*I skipped the nuts and sprayed the surface with edible silver after it had cooled.

Enjoy!

Thursday, 14 November 2013

Pancakes with a Mixed berry Compote...and the time I fed my academic-daughter-to-be.

No no no...not like that you guys!


Meet Prishaa ( hello sayang!!) My almost-academic daughter. I tentatively adopted her last year, in preperation for when I would hit 3rd year. Unfortunately she had to transfer to Royal Holloway and I lost my only child. :'( It's ok though. She'll come visit again during Raisin and I'll sneak her into the foam fight. :)

She came by for a visit last week and I had her over for breakfast to see how she was doing. Now, as her mama OF COURSE I had to make her a proper breakfast. So I woke up craving pancakes that morning and set about making them only to find that I was missing a few key ingredients.
What to do, what to do?

It's times like these you really curse DRA for not having a sundry shop nearby. Nevermind that they'd probably jack up the prices sky-high, that set-up would probably be a lot more conducive for Saturday morning breakfast moods. Unless of course you're one of those ultra-organized people who plan out their Morrison shops to allow for impulse cooking-sprees. I am NOT one of those people. At all. Hence coming back to my problem.

No milk, no buttermilk, nothing to put on the pancakes once they came off the pan. What else was a girl to do? I blearily wandered down to the DRA bistro and purchased a 'basic breakfast' (or some such drivel) and purchased a HIGHLY OVERPRICED  half cup of yogurt, frozen mixed fruit and coffee for 3 pounds.


It was all worth it though, for these pancakes. Some flour on my counter and a stolen clementine later (Thank you Elisa!! <3) Prishaa and I were sitting down to a lovely mother-daughter breakfast of 
Pancakes with a Mixed Berry and Clementine Compote.


Pancake recipe adapted and halved from Spicy Southern Kitchen

Pancakes ( makes 6, medium sized)
- 3/4 cup all-purpose flour
- 1 Tbsp sugar
- 1/2 tsp baking powder
- 1/2 tsp baking soda
- A pinch of salt
- 1/2 of a beaten egg
- 2 Tbsp butter, melted
- 1/2 cup yogurt +1/4 cup water
- 1/2 tsp vanilla extract


- vegetable oil, for cooking pancakes

+ Mix all ingredients together (except vegetable oil) and leave aside for 20 minutes.
+ Get your non-stick pan really hot. To see if it's ready, splash some water droplets on the pan. If they 'dance' (you'll see what I mean), then you're good to go.
+ Wipe the pan with some vegetable oil, spreading it around with a kitchen towel, the ladle out 1/4 cup of batter onto the pan.
+ Cook until the top looks bumpy and is covered with bubbles.
+ Flip the pancake and cook on the other side for a few minutes till nice and brown.
+ Serve up with toppings of choice. Maple syrup's nice if you want to be traditional, although nutella sounds like a decadent option as well. Of course, you could always make the SUPER EASY fruit compote below...


Mixed Fruit and Clementine Compote
- 1/2 cup frozen mixed berries
- 1 stolen (it won't taste the same if you get it through moral means) clementine
- 2 Tbsp sugar (adjust according to how sweet the berries are)
- 2 Tbsp water
- A drizzle of STOLEN honey

+ Put the berries in a pan and to it add the zest and juice of your stolen clementine. Combine with the sugar, water, and STOLEN honey.
+ Heat up the mixture till the sugar dissolves. Continue to keep on the hob and reduce till the syrup is nice and thick.
+ Spoon generously over still warm pancakes.

Happy breakfasting guys!!


Wednesday, 13 November 2013

Tetly Biscuit Thing...and the time I got overconfident and had to improvise.

So I am going to talk about that Great British Bakeoff now.

1) I couldn't make it to the viewing party cause I had a society party that ran over a little late. Although I was rooting for Kimberly, I'm happy Ruby did not win.

2) Today's is a lesson on turning lemons into lemonade. And also...maybe a lesson in overconfidence.


This post is long long overdue. Partly because I've made a lot of things since, mostly because I've been trying to avoid it. It comes down to an age old food bloggers dilemma, should I post my failures or not?
But you know what? It's just shortbread. Life goes on, and I keep cooking. More than anything this post will be a lesson in humility. And posting my 'failures'? A reminder of the dangers of overconfidence, and that you can salvage almost any bad situation. 

So here's a rundown, I made the dough and it turned out to be a beautiful shortbread dough (as you can see above). 
Just the right amount of crumble yet easy to mould. I rolled it up into a log and let it chill in the fridge over night before the party the next day. 

Took it out and it cut BEAUTIFULLY. 


Lightly scented with Tetley tea... I was really really excited. I thought this would be a fantastic biscuit. 
Now.... They went into the oven like this:

And after 15 minutes in that 180'C oven...
To my horror...
They came out like this:


What the hell happened to my beautiful dainty shortbreads??

I tried one. 
In all honesty they tastes ok. Very very buttery with a nice black tea aftertaste. 
But still totally not what I was expecting. The texture, while not unpleasant, was like a chewy feuille rather than a crumbly shortbread. 
The clock was ticking and I had to be at my meeting in 30 minutes. I couldn't bring these with me to the bake off party!
Then suddenly, a little voice at the back of my head whispered
Throw in 2 eggs and some chocolate. 

So I did. And I baked it again with fingers crossed. 
What came out was a very strange... Soft cookie. Slightly eggy and very cakey. 

By this time I had to rush off for the society meeting and completely forgot to take the....bar cookies? Bar cookies with me. 

My Flatmate got me to try them again in the morning and to my surprise... They weren't bad. The eggy taste had gone away and was replaced with a strong taste of tea. The dark chocolate chunks gave the bake just the right amount of sweetness and made it a bit more lush. It wasn't the disaster I thought it was. 

In hindsight, I must have put the full weight of butter and forgot I was halving the recipe. Moral of the story? No matter how much 'experience' you think you have? Always always ALWAYS triple check your measurements. And if things go sour, just add 2 eggs and some chocolate. 

And maybe a little bit of luck.