Showing posts with label simple. Show all posts

Tuesday, 14 June 2016

One-pot Red Curry Chicken and Rice...and the time I graduated from university.

One-pot Red Curry Chicken and Rice

I love the Stone Soup Story. Have you heard it before? Basically;
An old weary traveller arrives in a village one evening, tired from his journey. Hungry, he asks some of the villagers to share their food, but they all turned him away. Slowly, the old man made his way to the village square and set up a single cooking pot. He took a stone from his bag and placed it in the bottom of the pot, and then he poured some water over it and brought it to a boil. The villagers, curious about what he was doing, gathered around the old man. When asked what he was doing, he replied “Oh I’m just making my famous stone soup. This magic stone I have in this pot makes the most fantastic soup! So filling and fragrant..oh it’s delicious! If only… but…oh…oh nevermind…”.
“What? What is it old man? What?” the villagers prompted.
“Well…it is a brilliant soup mind you. Absolutely brilliant simply on it’s own. Such a simple, flavourful broth the stone makes…but oh! It would be just that much better with some cabbage. But nevermind nevermind…I will be more than content with this soup the way it is”
“I have some cabbage!” a woman called form the back. “Here my dear old man. Take it for your soup.”
“Why thank you!” the traveller cried, taking the crisp leaves and adding them to his boiling pot. “Oh this will make it so much nicer! Oh how kind of you! The soup was going to be brilliant before but now it will be simply sublime! But oh…if only…oh but nevermind there is no need simply no need….”
“No no tell us please! But what, old man?”
“Well…..this soup will be wonderful. Absolutely wonderful mind you,” he replied, “but it would be just that more delicious if it had just a few onions. Just a few onions would truly make it food of the Gods! But alas…there is none to be found here so never mind. It will be simply delicious just as it is.”
And so it went, the old man would have the villagers volunteering little scraps of meat and vegetables they had in their homes to add to this magical stone soup. Very soon, the soup was indeed, a most flavourful broth made rich with all the contributions of the village. The old man then fished the stone out from the bottom of the pot and together he and the villagers feasted, for together they had produced this delicious soup and delicious things are meant to be shared.
As I look forward and see my graduation ceremony coming up next week, I find myself thinking of the Stone Soup. I think of all those villagers adding to the pot without actually meaning to, and the old man who brought them together. Most of all I think of that soup. I think about how it started out as some water with a stone in it and became so much more through the gifts of people who didn’t realize what they were doing.
In a week, I’ll be graduating from the University of St. Andrews with a 2:1 degree in behavioural biology.
I’ll try not to get too heavy handed with the metaphor here…but I think you all get where I’m going with this. Yes, my degree was a result of my hard work, but as cheesy as it sounds I wouldn’t be here if it weren’t for a very supportive network of friends and family. I have so many people to thank.
My parents, who worked so hard to give me the very best education they could afford.
My academic mother who has always kept tabs on my progress in university, when it would have been so easy to fade out of contact once she graduated, and has always been ready with encouragement and advice.
My godparents who did the same, and made sure I knew I was always welcome in their home when university madness got too much.
My lecturers who got me interested and passionate enough in their courses that I kept going and didn’t just quit.
My friends, who made me laugh when I needed it most.
My housemates, who made our little student dig a home.
Their families, who adopted me and made sure I knew I was just as much a part of their family as their daughters were.
My boyfriend, who has never been more than a Skype call away.
The future is looking very bright, promising and scary. Mostly scary to be honest. All the same, I’m looking forward to all the new experiences I’m going to have and all the new people I stand to meet. Here’s to celebrating the past four years and the next chapter of my life about to begin.
Here’s to new pots of Stone Soup.

One-pot Thai Red Curry Chicken and Rice
Because if you're going to be celebrating, the last thing you want to be doing is washing pots and pans

-       2 tbsp vegetable oil
-       2 tbsp of your favourite thai curry paste ( I use my own from recipe here)
-       1 chicken breast, cubed small
-       1 cup basmati rice (washed till the water runs clear)
-       1 cup light coconut milk
-       ¾ cup water
-       2 kafir lime leaves
-       1 lemongras stalk (with the ends smashed with the side of a knife)
-       ½ cup frozen peas (steamed in the microwave)
-       ¼ cup fresh coriander (chopped finely, stalks and all)
-       2 tbsp roasted cashew nuts (very roughly chopped)
-       1 tbsp deep fried shallots

Method
1.     Heat the oil on medium heat in a large saucepan.
2.     Stir-fry the curry paste until fragrant, this should take 2-3 minutes.
3.     Add the cubed chicken and stir-fry till cooked through. Remove the chicken pieces and set aside.
4.     Add the washed and drained rice to the same pot. Scrap the bottom to make sure all the browned bits are removed from the pan.
5.     Add the coconut milk, water, kaffir lime leaves and lemongrass stalk, then bring to a boil. The minute the liquid starts to boil, cover the pot with a tight fitting lid and reduce the heat to as low as you can get it.
6.     Leave the rice to cook. This could take up to half an hour, but start checking after 15 minutes.
7.     Once the rice is cooked, remove from the heat and add all the chopped coriander in one go. Fluff up the rice with a fork, mixing in the coriander in the process.
8.     Gently combine the rice, cooked chicken and cooked peas so everything is evenly distributed.
9.     Divide into two bowls and garnish with roasted cashew nuts and fried shallots.

1.  Enjoy.

Wednesday, 12 August 2015

Silken Tofu with Peas and Mushrooms...and the time I admitted to being homesick.


When I was growing up, my nanny spoilt me by feeding me rice that had been cooked with pandan. The first time I had rice that had been cooked without it, I immediately noticed the lack of that familiar perfume. Putting a knot of pandan leaves into the rice pot is a practice I have continued to this day, and boy was I relieved to find them sold in the Asian supermarket!

You know, I have a tiny bone to pick with the UK.
Yes, the entirety of the UK.
Ok no...just the people who advertise for Scottish universities.

Now, you take tropical international students like myself and feed us tales of highland bagpipes and kilts and how all the men look like James McAvoy (ok, maybe that lie I got from the media but let's not get nitpicky here). Sure, you tell us the winters are cold. We expect that. We're not stupid. In fact, because we don't know any better we welcome this foray into the winter because it gives us a chance to be like all those cool instagram people! All bundled up in their hipster reclaimed tartan blankets, and urban outfitter jumpers, clutching designer mugs of rainforest certified hot chocolate. Oh how we live for the chance to capture this aesthetic! Yes, the blankets will come from Oxfam and the jumper will probably be from Primark but we will be there. Living the pictures we see on the Christmas cards back home.

But you know what you don't tell us? You know what the ultimate deception is here? Winter may leave. Hell, it might even be summer. That doesn't mean a damn thing. You don't tell us it's COLD ALL YEAR ROUND.

Huh. St. Andrews. Sunniest place in Scotland. 
Well yeah buddy, that really doesn't say much for the rest of Scotland.

Ok ok. I will acknowledge that most of this rant can be attributed to homesickness (yes ma, I said it. No ma, I do not need to fly home).  Being here over the summer while amazing (like genuinely, I've had the best time), it has worn me down a tiny bit. I miss my family, my friends, my boyfriend, my dog, not having to put on a jacket whenever I step out of the house, having durian on demand, having dim sum on the cheap, not having to make biryani myself....

Ok maybe slightly more than a little homesick.

But that is ok!!! 
This is something I can deal with. Millions of students have dealt with this before me and I am NOT going to wimp out. I am the master of my own moods.
And you know what gets me in a good mood?
Oh please...I'm not even going to finish that for you.

This was so simple to make. And don't be fooled, it may look plain but it packs a punch of flavour. 


Silken tofu with peas and mushrooms
~ 2 tbsp veggie oil
~ 1/2 inch ginger (minced)
~ 2 cloves garlic (minced)
~ 5 chestnut mushrooms (stems separated from caps, sliced.)
~ 1 big red chilli (sliced)
~ 1 cup water
~ 1 tbsp soy sauce
~ 1 tbsp oyster sauce
~ 1 cap full Chinese rice wine
~ 1 tsp sesame oil
~ a pinch of sugar
~ 1/2 cup frozen peas
~ 300g silken tofu (cut into cubes)
~ 1 Knorr fish stock pot

OK, first thing you want to do is crank the heat all the way up on that wok. ALL the way up guys. All your ingredients have been prepped. Don't worry. I believe in you.

Pour the oil in along with the ginger and garlic. Keep tossing it around the wok until you have garlic and ginger perfuming the air. Add the sliced up mushroom stems and stir fry till slightly softened. Add the sliced caps and sliced red chilli and stir fry for about a minute. Add your water all in one go. It will sizzle. You will live. I promise. Add the soy sauce, oyster sauce, rice wine, sesame oil and sugar. Stir to dissolve then add you peas and tofu. Stir, but be gentle. You just want to separate the tofu pieces, but silken tofu is fairly delicate and you run a risk of breaking the pieces. That will happen, no getting around that. But let's keep it to a minimum, shall we?
Add the stock pot ( I LOVE THESE. I keep a few of the veggie and chicken ones in my cupboard as well. They're so easy to use and are great for thickening sauces and soups), stir, then cover with a lid and let simmer for 3 minutes to warm up the tofu and peas. Serve hot over a bed of hot rice.

Best eaten whilst under a duvet and watching That 70s Show. 

Thursday, 9 October 2014

Oven Roasted Tomatoes and Sausages...and the time I fell in love with produce.

In case you haven't realised by now, food makes me very happy. It's gotten worse since coming to university... my day can go from shit to glorious under 5 minutes if I find some nice strawberries or an unusual pasta. Or in this case...some beautiful tomatoes.


I mean look at them! Are they not the most beautiful vine tomatoes you've ever seen?? I normally don't even like tomatoes but I saw these sitting on display all ruby and beautiful and I just HAD to get them. And boy am I glad I did. These tasted amazing. Really sweet and..well...tomatoey? You know what I mean right? When you buy not-so-nice tomatoes and all they taste of is water? It wasn't a case at all for these. I could've eaten them raw...which I didn't.

I haven't gotten that emotional over vegetables yet. :p


This dish was something I saw on a Jamie Oliver show. It's crazy easy, and suits whether you're feeding just yourself or a crowd. Imagine if you will, taking this dish steaming out, straight from oven to table. Plonk a fresh baguette on the table and let everyone just dig in together with their hands. Or toss in some pasta and devour when it's cold and rainy outside.

Rather than give you a set recipe, I'll type out rough proportions so you can scale up or down as necessary. Unexpected guests you need to impress? You can have this on the table in 45 minutes WITHOUT slaving over a hot stove.


Oven Roasted Tomatoes and Sausages
- Enough vine tomatoes to cover the bottom of your baking dish when halved.
- 1 clove of garlic for every 2 sausages
- oregano
- salt
- sugar (if your tomatoes need a little brightening up)
- Olive oil
- 2-3 sausages per person

+ preheat oven to 190'C

+ Wash the tomatoes and halve them. Arrange them in a baking dish so they are (mostly) cut side up. Roughly chop garlic and add to baking pan. Season with oregano, salt and if needed, sugar. Drizzle a healthy dose of olive oil over the tomatoes and toss to combine. Rearrange tomatoes cut side up if necessary.


+ Prick sausages once so they don't explode in the oven. Arrange them over the top of the tomatoes. Bake for 45 minutes, turning the sausages halfway so they brown on all sides. When turning the sausages you might want to drain away some of the fat from the pan, quite a lot comes out of the sausages.

+ Enjoy with warm crusty bread or hot pasta. Or both! :)

p.s- leftovers from this are great! Imagine the pasta bake that would come out of this...


Friday, 12 September 2014

Chocolate Chunk Banana Bread...and the time I wanted a legit excuse to have chocolate for breakfast.


WHERE DID THE SEMESTER GO???
Seriously guys, this is ridiculous. I could've sworn I started second year just last week. How are we a month away from the summer holidays? How? This is outrageous. Unthinkable. WHAT EVEN?

It's times like these that really frighten me...cause so much has gone past and it really feels like I've barely accomplished anything. Well...maybe a few things. I'm slowly starting to branch out and figure out my own recipes for one thing. It's exciting and wonderful and quite the adventure I must say. Eventhough most times it's less about figuring out the right ingredient ratio and more about working around what I have left in my pantry.


This banana bread was something I've wanted to make for a while. It's very moist and full of rich bananana flavour. A lot of that will depend on how ripe your bananas are. You really need to let them go as spotty and black as you possibly can. Not like the ones in the first picture. I had to wait a couple of days for them to be really ready.  Overripe is the only way to go here. If they reach that perfect all-black stage but you haven't got time to turn them into banana bread, just bung them in the freezer, and defrost when you're ready.


Chocolate chunk banana bread.
- 2 large VERY ripe bananas
- 1 tsp honey
- 1/2 tsp vanilla
- 1/4 cup of 1 part vegetable oil and 1 part melted butter (I'm sorry, I know that sounds super weird but that's how it gets so moist without tasting oily)
- 1/4 cup yogurt
- 1 egg
- 1 cup flour
- 1/4tsp cinnamon
- 1/2 tsp baking soda
- 1/4 tsp salt
- 1/2 cup sugar
- 150g semi-sweet chocolate, cut up into chunks

+ Preheat oven to 180'C
+ Mash the bananas with the honey and vanilla. Beat in the yogurt, oil, butter and egg.


+ Shift in the flour, cinnamon, baking soda, salt, and sugar. Stir until just combined.
+ Stir chocolate chunks through batter.
+ Pour batter into well buttered loaf pan and bake for 50 minutes or until cake tester in center comes out clean.
+ Let cool in pan for 5 minutes, before turning out onto wire rack to cool completely.

Before we go, wanna see my beautiful Flavours of Malaysia profile picture?

Wanna know what Flavours of Malaysia is? Just click here!! -->

Tuesday, 13 May 2014

Mushroom soup...and the time I asked Santino and Paolo to fall in love with me.


Someone please put an end to my torment. Why do we have exams? Why? I am not going to be a doctor. My line of work is not going to need me to make split second decisions on someone's life. I'm assuming as a psychologist I will have the luxury to let the patient leave, then calmly consult my copy of the DSM-IV-TR (whichever edition it will be in) and determine "hmm...yes...schizophrenia it is..."

Elisa has done nothing but laugh at me this past week, simply because I've been watching John Bluth's Thumbelina on repeat and listening to the Roger and Hammerstein's Cinderella musical soundtrack (ahem, Santino Fontano? Paolo Montalban? Please fall in love with me?) from dawn to dusk. And you know what I have HAD IT. Where is my prince charming? Is my fairy prince lost? Normally I rescue myself with chocolate, but I need reinforcements for the exam diet. If anyone can look you in the eye and say that they sincerely do not want a fairy prince to take them on a magical bumblebee joy ride so they don't have to study, then they are LIARS.


Ah well...ranting and fantasy aside, what I say is true. My body is weak and my soul is TIRED. And assuming you're in the same place, this recipe will help. Mushroom soup is is the elixir of life. It has the power to calm the body and soothe the soul. This version is very chunky, and you get nice chunks of mushroom throughout, held together by a thin rich broth. Use any mushrooms you'd like. Well...ok, please don;t use button mushrooms if you can help it. They're sad sad little things with basically no flavour. Much like students during finals week.


Mushroom soup

~ 1 Tbsp butter
~ 1 Tbsp olive oil
~ 2 cloves garlic, minced
~ 1/4 diced sweet onion
10-12 mushrooms of your choosing, cut into rough 1cm bits.
~ 1/2 cup chicken stock
~ 1/2 cup milk
~ salt, black pepper and smoked paprika to season
~ a handful of chopped chives.


+ In a small pot, melt the butter and olive oil together, then use it to fry the onion and garlic till fragrant.
+ Add the mushrooms, and let them sweat for a little bit. They'll soften up and go nice and tender. Season with some salt and smoked paprika.
+ Add your chicken stock and milk, simmer till the soup is as thick as you would like it to be. At the last minute, toss in your chives. Sprinkle over some black pepper for a little extra kick.


Alright guys, this recipe is my exam week present to you. Take a break, stretch your back and make it for yourself. Mop the bowl with some bread and feel your body slowly come back to life.
Remember, you are going to be absolutely fine. You have done as well as you possibly can and no one can ask for more than your best.

Good luck!


Friday, 2 May 2014

Sago Pudding with Strawberries and Coconut Cream...and the time I made dessert on the fly.


Revision week is upon us, and as usual all I can do is watch Anthony Bourdain wax lyrical about the food I have left behind. I really need to force myself to start thinking about Comp Phys and Psychology instead of Nirwana Maju banana leaf...but I'll just watch one more curry laksa video...just ONE more..

Anyways, before the sadness of revision week set in I had two lovely people come over for dinner. Ben and Jen helped me so much during Flavours of Malaysia and were such an integral part of the night. Problem is Flavours turned out to be a bigger success than we expected it to be, and because Ben and Jen were helping two of our volunteers by the time they got to the hall all the food was gone. That dinner was my way of saying thank you for being there every step of the way, especially when it came to bargaining for ingredients in Dundee.


I'd already decided on a chicken rendang and briyani for the main meal, but dessert was proving to be a challenge. Sago Gula Melaka would've been the perfect end to such a heavy meal, but I was a little low on the sago front. Making a cake would've been too involved, and also very heavy. It got to the point where I was almost resigned to sending them home without dessert when one of those beautiful flashes of inspiration hit me in the face. I had strawberries.

So, this Strawberry Sago dessert was born and by God did it go down well. Not too sweet and very refreshing it was almost a... Malaysian take of strawberries and cream if you will. To keep it nice and chilled we use frozen berries instead of ice cubes so the whole thing doesn't get watered down. It also adds a very nice texture, and if you use clear bowls you'll get to see the ruby red crumble peaking out between layers of smooth smooth coconut cream and sago. I have to say though, you could probably do this with any berries. The key to making this dessert lies in using pandan leaves. Without them the sago loses some sparkle and the coconut cream is not half as fragrant. Any Asian supermarket should carry them, or if you plan ahead, I'm fairly sure you can get them from Amazon.


Ben was nice enough to come by a little early to take all these beautiful photographs you see today. He and Jen came bearing a veggie and pork stir fry and some dim sum. And believe you me, we FEASTED.


Strawberry Sago
Serves 4

+ 1 punnet strawberries
+ 1/4 cup sago pearls (the small ones)
+ 1/2 can thick coconut milk (about 200ml)
+ 3 pandan leaves
+ 1/4 cup sugar
+ 1/4 cup water
+ The juice of 1/2 a lime
+ salt

~ Wash the strawberries and hull them. Choose 4 of the prettiest ones and set aside for garnishing. Cut the rest up into smaller pieces, wrap in foil and freeze for at least 2 hours. 


~ Wash the sago pearls and soak them for 30 minutes. Place in a saucepan with a pinch of salt, 2 knotted pandan leaves, and plenty of water, then boil till translucent. Strain, then pour into a lightly oiled container and place in the fridge to set and chill.

~ Don't forget to stir the can of coconut milk before pouring out! The really thick cream would have floated to the top and set. Pour the coconut milk into a saucepan with the remaining pandan leaf knotted up and a pinch of salt. Set on a low heat. Be careful here guys... coconut milk is very prone to separating on high heat. You want that in a rendang, but not a dessert. Heat the milk till steam starts to rise off the top, then immediately take off the heat and allow the pandan to really infuse it's scent and flavour. Pour into a jug, keep the pandan leaf in there and set in the fridge to really chill.

~ Melt the water and sugar together to make a simple syrup. When all the sugar has dissolved, take off the heat and squeeze in the fresh lime juice. You shouldn't add it at the beginning because lime juice can get bitter when it's been heated too high. Once again, when cool to touch place in the fridge to completely chill.


~ Now, when you're ready to serve take the strawberries out of the freezer and mince em' up in a food processor with a little bit of the lime syrup. Remove the pandan leaf from the coconut milk, and mix in your chilled sago. Layer the dessert up, starting with the frozen strawberry mixture, then the coconut-sago mix. You should have 4 layers, ending with a coconut-sago layer. Garnish with the strawberries you set aside earlier and a drizzle of the lime syrup. Serve up more on the side for those guests with a sweet tooth (I'm looking at you, Ben :p)

And that's that! Good luck for finals week everyone. Don't forget to treat yourself and be kind to your body. It'll be summer soon!!


Monday, 17 March 2014

Lemon and Raspberry Tart...and the time I got over myself and used a store-bought pastry case.

SPRING BREAK IS HERE LADIES AND GENTLEMEN. I’m heading down south (I think?) to stay with mum’s penpal. It’s a little sad outside…very grey and gloomy. But BBC weather says that it’s going to be nice and warm in Croughton so I’m not complaining. J It’s not quite going to be a wild spring break in Cabo (Although seeing the chickens wandering around in bikinis is a pleasant thought) but I’m really excited. The last time I saw Lesley was when I first arrived in the UK, and I’ve been dying to go back to her beautiful house ever since.

Despite their protests, I’ve promised to cook for my keep which I’m really looking forward to. To be completely honest I’ve kinda lost a bit of my cooking kick this semester. Too much going on, too many deadlines… a change of scenery is just what I need to get back into gear. The train ride has given me a chance to start planning menus in my head. I know I want to do spatchcock chicken at some point and I’ve brought curry powder for an Indian night, but the rest is pretty much up in the air. Shall I do the roast pork belly again you think? Or maybe dumplings? And what about something new? Puddings? The brain in pulsing with new recipe possibilities and I’m glad. It hasn’t had a chance to do that in a while.

Speaking of cooking (not that I ever talk about anything else), Fiona decided on Saturday night to show Eli and I what a proper British roast dinner was like. On a crazy whim we got into her car for an adventure!
 (When I say ‘adventure’, I mean a chicken run to Morrisons, with a stop at Sally’s quad to steal some rosemary)


Anyways I volunteered to make a lemon raspberry tart for pudding. And this is a recipe I really wanna share because it’s so simple to throw together. It’s the sort of thing that looks very glamorous but literally takes minutes to put together on your part. And it all boils down to a little bit of cheating (i.e-using a pre-made shortcrust tart shell).

Now don’t get huffy. When your counter is covered in potato peelings, oil spills and raw chicken sometimes a pre-made crust is what pulls you back from the brink of dinner party insanity. And no one will honestly be able to tell the difference. Once you pop the shell on a baking tray, all that’s left for you to do is whisk up the fabulously lemony filling, pour it in and bake.


Lemon Rasberry Tart
-         -  One 20cm premade shortcrust pastry shell. (be careful to choose one that isn’t cracked or broken)
-          - 2 whole eggs
-          - 2 egg yolks
-          - ½ cup castor sugar
-          - ¼ cup flour
-          - The juice of 2 ½ lemons (Quick tip: rolling the uncut lemon on the counter before squeezing will give you the most juice with minimal effort)
-          - 1 small punnet of raspberries.
-          - Icing sugar and double cream to serve.


+ Preheat your oven to 180’C
+ Put the tart shell on a baking sheet with some parchment paper underneath.
+Whisk together the eggs, egg yolks, castor sugar and flour. Then add the lemon juice and mix well.
+ OK, so you’re going to want to put your pastry case in the oven and then carefully pour in the lemon filling. I poured it in first and carried the lot over, but that resulted in a good lot of the filling sloshing out of the pastry case before the tart even made it to the oven!
+ Bake for 20 minutes. There won’t be any jiggle to the filling when you take it out. Don’t worry; this is more like a lemon bar topping rather than the usual lemon curd. It will still be smooth and creamy when you cut into it.
+Let the tart cool down and transfer to a plate. Bejewel the top with raspberries and chill for atleast 2 hours.
+ Just before serving, dust with icing sugar and serve with some double cream on the side.


:3 I’ll leave you to humbly accept the fountain of compliments you receive for all the ‘hard work’ you put into dessert. Enjoy!


Wednesday, 12 March 2014

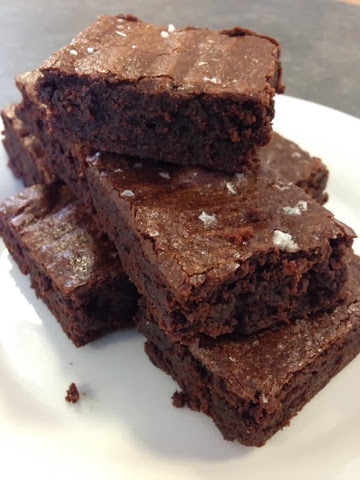
Alice Medrich's Cocoa Brownies


I'm really picky about my brownies. To me, a good brownie starts with the way it looks. Specifically that beautiful, crackly tissue paper crust. You know what I'm talking about right? That light, flaky top that all great brownies seem to have. Then when you bite into it, it shouldn't be cakey or gooey. No, a good brownie hits that golden sweet spot of FUDGY and it tastes of CHOCOLATE. Not a flat, vaguely cocoa-ish taste that disappears into a sugary abyss 2 seconds after you bite down. No. A superior brownie will punch you in the face with an intense, deep, dark chocolate high that'll swirl around your entire mouth till you basically see nothing but chocolate.


Having said that, I can't make a good brownie.
Don't get me wrong, I've tried over and over.
But brownies have always been a problem for me. I know they're supposed to be one of the first things you learn how to make, but I've never found a recipe that's been able to co-operate. Somehow it always ends up either dry or undercooked. Most times straight up burnt. NEVER with the Holy Grail of 'beautiful crust'. Maybe I'm being over-critical but I've just never been happy with how my brownies turn out.

So I'm still on my brownie quest. Maybe not quite with the determination and vengeance that I started off with, but I do try. It was on one of these brownie quirks that I tried making Alice Medrich's cocoa brownies. I've seen so much about them over the years online, but always passed them over as potential flops. I mean... a brownie recipe with no chocolate? Madness! Then one fateful evening a brownie craving arose and I didn't have any dark chocolate in my cupboard nor was I willing to walk 40 minutes to get some. I really wish now that moment had come sooner. Alice's brownies are brilliant. They've got that perfect fudgy texture and chocolatey flavour. I added a sprinkling of Maldon sea salt over the top and that did it for me. My only criticism was that I didn't get that crowning tissue paper crackle. Although, that could've been something I did wrong. Any ideas? Comment below if you know the secret to that beautiful top!


Alice Medrich's Cocoa Brownies

- 10 tablespoons (1 1/4 sticks) unsalted butter
- 1 1/4 cup sugar
- 3/4 cups plus 2 tablespoons unsweetened cocoa powder (natural or Dutch-process)
- 1/4 teaspoon salt
-1/2 teaspoon pure vanilla extract
- 2 cold large eggs
- 1/2 cup all-purpose flour
- 2/3 cups walnut or pecan pieces (optional)


+ Position a rack in the lower third of the oven and preheat the oven to 325°F. Line the bottom and sides of an 8-inch square baking pan with parchment paper or foil, leaving an overhang on two opposite sides.
+ Combine the butter, sugar, cocoa, and salt in a medium heatproof bowl and set the bowl in a wide skillet of barely simmering water (I just used the microwave. Blast for 30 seconds and stir. Repeat till smooth). Stir from time to time until the butter is melted and the mixture is smooth and hot enough that you want to remove your finger fairly quickly after dipping it in to test. Remove the bowl from the skillet and set aside briefly until the mixture is only warm, not hot.
+ Stir in the vanilla with a wooden spoon. Add the eggs one at a time, stirring vigorously after each one.
+ When the batter looks thick, shiny, and well blended, add the flour and stir until you cannot see it any longer, then beat vigorously for 40 strokes with the wooden spoon or a rubber spatula. Stir in the nuts, if using. Spread evenly in the lined pan.
+ Bake until a toothpick plunged into the center emerges slightly moist with batter, 20 to 25 minutes. Let cool completely on a rack. Lift up the ends of the parchment or foil liner, and transfer the brownies to a cutting board. Cut into 16 or 25 squares.

I'll leave you to bask in your chocolate comas. :p Till next time!