Showing posts with label bread. Show all posts

Friday, 7 August 2015

The Honey & Co. Baking Book - Chocolate and Hazlenut Krantz Loaf


I AM NOW 23
Chocolate and Hazelnut krantz loaf
When did this happen? I have no idea. I woke up and I was 23 and now I need to look up how to pay taxes and buy houses. This is terrifying. I am....ADULTING.

Naturally the only reasonable response to this is to not acknowledge it's happening. So I'm just going to retreat into the kitchen and not give any notice to this strange maturation process. Come get me when I'm 99 and in need of an old folks home where once again I won't have to make my own decisions, and will instead allow people to push me along in a wheelchair while I mumble over recipe books.

Speaking of recipe books, a HUGE shoutout to everyone who got me a cooking related item (which was basically all of you) as a birthday gift. I am now in possession of a teal soup ladle that's been modeled after Nessie, the Great British Bake-Off cook book, a cook book by Mary Berry, a multipurpose grinder to make curry pastes and powders, and a truly fantastic cleaver. You all know me so well, thank you so very much.

Anyways! Today's post is the first recipe review of the Honey&Co. Baking book. The first of many I assure you. Every single dish in that book is screaming to be made and I can barely wait to try them all. I started with this one, because I was looking for an appropriate gift to thank my neighbours for being so nice after a little unpleasant encounter I had.

Last week while I was walking home two guys driving a van pulled up in front of me and asked me to get in with them. And in a fairly skeevy manner too. I gave them a very firm "um no thank you" and walked off, and as they drove ahead the guy in the passenger's seat gave me a sleazy grin and a wave. It was all very creepy, and as I was walking home, Kate (the lady who lives next door) was out in the garden and I told her what happened. She was very disturbed on my behalf and said I was free to come over if I wanted to. I got home, called the police, settled everything...but after they left I was pretty creeped out and not in the mood to be alone. So I went next door and Kate and David (her husband) were lovely. They offered to put me up for the night so I wouldn't be sleeping alone and I accepted.

Prove prove prove!
I was extremely grateful and wanted something nice to thank them. This chocolate and hazlenut krantz loaf really fit the bill.

This loaf is one of the three babka recipes listed in the book. And guys...it's beautiful.

You don't even understand. This is Cinnabon on crack. This is grown up nutella on toast. This is moist, buttery, cinnamony, chocolatey, nutty, chewy, soft heaven. It is rich. It is lush.

It might induce a sugar headache. Be sensible. Eat small slices.

Now...a quick side note. The posts that I do on the Honey&Co. baking book will not include corresponding recipes. They'll be more of...recipe reviews. How I found making the thing... any drawbacks or kinks... and tips I found helped me. Reason being, I don't feel very comfortable posting recipes from cook books. If (by some miracle) Sarit and Itamar read this post and say "Yeah, sure, go ahead, share our recipes", then I absolutely will because this is a recipe worth sharing. But till then, it's just going to be my experience baking the thing.

We cool?
Cool.


This was an amazing recipe to follow from start to finish. However, I will say one of the drawbacks right off the cuff is that it is time consuming. But not a bad sort of time consuming. There isn't hours and hours of intense labour, just a lot of waiting time in between. For starters, after making the dough you have to let it rest for atleast 6 hours in the fridge. Bottom line, plan ahead with this one. You will have to start the day before you want to eat it.

There is a basic babka dough recipe that Sarit and Itamar use, that is then filled and molded to make the various buns. This dough is very easy to work with. Like...EXTREMELY easy. I have made a lot of bread, from a lot of different recipes. There have been times where I have kneaded a 'dough' for 3 hours to have nothing but gloop on my counter. There was one time that the 'dough' I was working on was so tough, that by the time it was properly kneaded my wrist was sprained and stayed swollen for a week after.

This isn't at all the case here. Maybe because it's so intense on the butter, this dough comes together like a dream. All you need is about 5 minutes of kneading before you get a smooth elastic ball of putty in your hands. ALSO your hands come out super soft. I am not even kidding, your skin becomes a kind of soft no moisturizer will achieve. I could wax lyrical all day, but bottom line is that this is a beautiful, beautiful, beautiful dough to work with. Don't be scared, just get in there.
Rolled out and filled
I made the dough the night before, then had a nice lie in before waking up to make the filling. More butter goes into this, along with very dark chocolate, some ground cinnamon and a fair bit of sugar. Now, because I used granulated instead of caster sugar the filling came out quite grainy. Personally I liked it, cause it added a sugary crunch along with the nuts. You then roast a handful of hazelnuts and roughly chop them up to be sprinkled on top of the filling.

Sarit and Itamar tell you to leave the dough in the fridge till the last possible minute and I can see why. While it doesn't rise much (which I'm guessing happens because the dough uses all milk and no water), it's also very soft from all the butter. I would not be able to roll this out back home. Not without putting the slab in the freezer every 2 minutes, or working in an air conditioned room. You may think you won't be able to roll out the 50cm x 30cm rectangle specified. Don't worry, you will. Just keep at it. Again it's a very easy dough to work with, but just needs a little patience to be rolled out that thin. The amount of filling specified is perfect. You then sprinkle the hazelnuts over, roll up, then put it back in the fridge for 10 minutes before shaping.

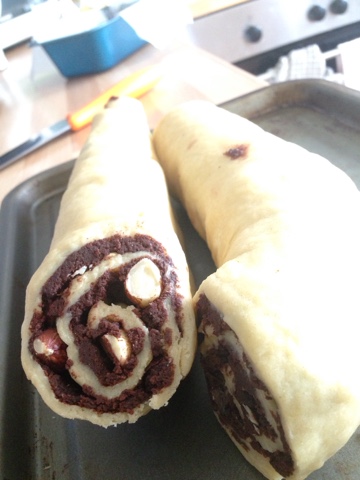
Split in half to twist
It's a little fiddly splitting the log in half and twisting it, but don't worry. YOU are the boss of this dough. Just be firm, and pat any loose filling back into place.

This is the point where you leave it to prove for two hours....and I forgot about it. :p I wandered off to do some cleaning and came back about 3 hours later. Again, don't be surprised if it hasn't proved up alot. It will still feel soft and fluffy to the touch. Bake it and I CANNOT STRESS THIS ENOUGH.
USE
THE
SUGAR
SYRUP

Guys do it. don't worry about the loaf having too much sugar in it. Again, just have a small slice. The syrup makes this so so SO moist and gives it a lovely shine...just do it, ok? Promise me you'll do it.
Do it.

So yes, I don't have to tell you anything else about this loaf, I'll let the pictures do the rest of the talking. Please. Please. I'm begging you. Buy the book. Make this babka.

BOOM

Well done Honey&Co.

Friday, 12 September 2014

Chocolate Chunk Banana Bread...and the time I wanted a legit excuse to have chocolate for breakfast.


WHERE DID THE SEMESTER GO???
Seriously guys, this is ridiculous. I could've sworn I started second year just last week. How are we a month away from the summer holidays? How? This is outrageous. Unthinkable. WHAT EVEN?

It's times like these that really frighten me...cause so much has gone past and it really feels like I've barely accomplished anything. Well...maybe a few things. I'm slowly starting to branch out and figure out my own recipes for one thing. It's exciting and wonderful and quite the adventure I must say. Eventhough most times it's less about figuring out the right ingredient ratio and more about working around what I have left in my pantry.


This banana bread was something I've wanted to make for a while. It's very moist and full of rich bananana flavour. A lot of that will depend on how ripe your bananas are. You really need to let them go as spotty and black as you possibly can. Not like the ones in the first picture. I had to wait a couple of days for them to be really ready.  Overripe is the only way to go here. If they reach that perfect all-black stage but you haven't got time to turn them into banana bread, just bung them in the freezer, and defrost when you're ready.


Chocolate chunk banana bread.
- 2 large VERY ripe bananas
- 1 tsp honey
- 1/2 tsp vanilla
- 1/4 cup of 1 part vegetable oil and 1 part melted butter (I'm sorry, I know that sounds super weird but that's how it gets so moist without tasting oily)
- 1/4 cup yogurt
- 1 egg
- 1 cup flour
- 1/4tsp cinnamon
- 1/2 tsp baking soda
- 1/4 tsp salt
- 1/2 cup sugar
- 150g semi-sweet chocolate, cut up into chunks

+ Preheat oven to 180'C
+ Mash the bananas with the honey and vanilla. Beat in the yogurt, oil, butter and egg.


+ Shift in the flour, cinnamon, baking soda, salt, and sugar. Stir until just combined.
+ Stir chocolate chunks through batter.
+ Pour batter into well buttered loaf pan and bake for 50 minutes or until cake tester in center comes out clean.
+ Let cool in pan for 5 minutes, before turning out onto wire rack to cool completely.

Before we go, wanna see my beautiful Flavours of Malaysia profile picture?

Wanna know what Flavours of Malaysia is? Just click here!! -->

Wednesday, 2 April 2014

Strawberry and Satsuma Fruit Butter...and the time I wanted to go back to Altnaharrie.


It's been a little over a week since I got back from Blenheim. Of course classes have picked up full swing, what with the exams being just over a month away. Flavours of Malaysia is coming up very soon as well, so everyone on the committee is getting ready to release some yummy Malaysian goodness over the town!! :3


Needless to say...the stress is building up a little. I find myself constantly in one of those there's-too-much-to-do-so-I'll-do-nothing-at-all type moods, and it doesn't help that I've just found the first 2 seasons of Ugly Betty on Netflix. Somebody give me a shock I need to get out from under my duvet and get my life back on track!!


Sometimes I find myself drifting back to Altnaharrie...long days  spent in that sun flooded conservatory...watching horses and pheasants in the field...strolling to the village co-op to pick up supplies for dinner (which led to a fair bit of improvising on my part, the co-op wasn't exactly well stocked) and most of all to the little kitchen. I spent a week of blissfully sunny days overlooking the garden cooking up little things with too much butter and not enough vegetables. This fruit butter was one of the first things I made there. It was made to fill a Victoria sponge, but there was soo much extra I had it with my granola and yogurt for the rest of the week. Lesley enjoyed it soo much that I made another batch before I left for her to have for brekkie too. :) It's one of those things you just throw together and let blip away on the stove while you have a long, leisurely breakfast. Simple, and delicious.


Altnaharrie Fruit Butter
- 200g strawberries
- 2 satsumas
- 2-3 Tbsp sugar ( I used Lesley's homemade vanilla sugar. Adjust according to how sweet your fruits are)

+ Wash, hull and cut your strawberries into halves. Peel the satsumas and cut off the whitish membrane that surrounds each segment. Try to conserve as much juice as possible while doing this.
+ Mix everything together in a medium saucepan and set on the lowest heat setting you can turn your stove to. Leave to cook, stirring occasionally for 45 minutes or until thick and jammy.
+ Allow to cool, then bottle up in a clean jar. Keep refrigerated. Goes great on yogurt, toast, pancakes and in sponge cakes.

Till next time! :)

Wednesday, 16 October 2013

Red Bean Pau...and the time I had colourful pigs in my steamer.


God it's been such a long week... or rather it just felt really long. Just handed in an essay earlier today and heaved a huge sigh of relief. Honestly, if I had it my way I would just cook my way through university. Can just imagine it... getting my lecturers around my kitchen table and feeding them till they agree to give me my degree.
BAH! I wish.
Still... a girl can dream... And anyways, just because I haven't been posting doesn't mean I haven't been cooking. OOoooooooohhhh no no no no. Hell, I threw a dinner party (well...ish. I had to ask my guests to bring their own cutlery. BUT STILL!) on Sunday while I should have been writing my essay...
Anyways, enough of the worky nonsense. Just rest assured that I have quite a few posts planned for here. Starting with these! Aren't they adorable??

Over the summer I discovered dim sum for the first time, And one of the first things I tried were red bean buns. In both the places I had them, they were shaped like cute little pigs! After being here for about a month, I started craving them for breakfast one day and to the amusement of my flatmates I started to make them. COMPLETELY from scratch. Including the red bean paste. To be frank though, while the process was time consuming it wasn't actually too hard to put everything together. If you're planning to make the paste, just give yourself an extra day to let the red beans soak before you plan to eat these. They were pretty good, if I do say so myself. :p Although, I would've liked the red bean filling to be a little smoother...maybe I'll borrow someone's blender next time instead of using my food processor. That, and I have a feeling I steamed them a wee bit too long, so they were a little tough. But my flatmates assured me that the bread was nice and soft, so I'm probably worrying for nothing. I did re-steam them in the morning for brekkie though, and they turned into tough little bullets. XS Not nice, at ALL. Other than that, I'm very very proud of these. You should definitely give them a go!

Red Bean Piggy Buns

Unless you're planning on using a pre-prepared filling (nutella would be really yummy...albeit not very traditional), start by making that first. I used a easy recipe I found online. The only things I did differently were to reduce the oil measurement while frying the paste to make it a little healthier, and add a pandan leaf to the pan with the bean mixture for an added aroma.

Recipe originally from here: http://chinesefood.about.com/od/dessertsfruit/r/redbeanpaste.htm
NOTE: Remember, you need an extra day before making the buns to soak the beans before cooking them.

Ingredients:

  • 2/3 cup dried red beans
  • Water for boiling
  • 1/2 cup sugar
  • 1/4 cup oil for frying

Preparation:

Wash the beans and throw out any that are damaged. Place the beans in a small to medium-sized saucepan, cover with water and soak overnight. (This helps shorten the cooking time).
  The next day, bring the beans and water to a boil. Simmer for 1 1/2 - 2 hours, until the beans have softened, adding more water as necessary. Drain.
  Process the beans in a blender until smooth. Remove from the blender, and stir in the sugar.
  Heat the oil in a wok or frying pan. Fry the beans on medium-low heat (about 4 on an electric stove) for a few minutes until they are dry, pressing them gently with the back of a spatula to form a paste. Cool and use as called for in the recipe. (Stored in a sealed container in the refrigerator, homemade sweet red bean paste will last for approximately one week). Yields approximately 1 3/4 cups.
+ When cool, divide the paste into 15 little balls. Set aside.
For the dough, I used this recipe from blogger Happy Belly. She's a fellow St. Andrews student, a friend of my academic mum's, and absolutely fabulous. I haven't quite gotten the courage to tell her I love her blog...fingers crossed she find this and all will be revealed without me having to do anything. :p I used a little less than the 150ml of water she specifies. Also, I used 7g of yeast (because that's the amount that came in the sachet) and a teaspoon of caster sugar just to make the dough slightly sweeter.
Ingredients
200g plain flour
5g active dry yeast
150ml warm water

Disolve the yeast in a bit of  the water, pour it over the flour. Mix, then slowly add the rest of the water until it comes together to form a dough. 150ml may not be correct, just make sure it's a very soft dough that doesn't stick to your hands. Knead for a couple of minutes until smooth, put in an oiled bowl, cover with a damp towel and leave it to rest for about an hour.  

Divide the dough into equal portions ( I made 16 balls of dough). You can either form into balls and have them as bread or you can flatten them and put in a scoop of a filling of your choice, then enclose it completely and roll into balls.  Pour cold water in a pot and place your steamer on top.  Line the bottom with an oiled greaseproof paper and place your buns on it.  Make sure you don't put them too close to each other.  Cover with a towel and let it rest again for about 10 minutes before removing the towel, replacing it with a lid, and turning the heat up to high.  When the water starts boiling, turn the heat down to medium and steam for a further 10-15 minutes until done. 

+ After rolling all the buns with filling in them, colour the extra ball of dough using the food colouring of your choice and mould some ears and noses to attatch to each bun. Dip a toothpick into food colouring and poke into the bun to make marks for the eyes.


Voila! Ok, ok...so it's a pretty long post. But I PROMISE, these are actually not hard at all to make. All you need is a little patience. Good luck!