Showing posts with label pretty things. Show all posts

Friday, 7 August 2015

The Honey & Co. Baking Book - Chocolate and Hazlenut Krantz Loaf


I AM NOW 23
Chocolate and Hazelnut krantz loaf
When did this happen? I have no idea. I woke up and I was 23 and now I need to look up how to pay taxes and buy houses. This is terrifying. I am....ADULTING.

Naturally the only reasonable response to this is to not acknowledge it's happening. So I'm just going to retreat into the kitchen and not give any notice to this strange maturation process. Come get me when I'm 99 and in need of an old folks home where once again I won't have to make my own decisions, and will instead allow people to push me along in a wheelchair while I mumble over recipe books.

Speaking of recipe books, a HUGE shoutout to everyone who got me a cooking related item (which was basically all of you) as a birthday gift. I am now in possession of a teal soup ladle that's been modeled after Nessie, the Great British Bake-Off cook book, a cook book by Mary Berry, a multipurpose grinder to make curry pastes and powders, and a truly fantastic cleaver. You all know me so well, thank you so very much.

Anyways! Today's post is the first recipe review of the Honey&Co. Baking book. The first of many I assure you. Every single dish in that book is screaming to be made and I can barely wait to try them all. I started with this one, because I was looking for an appropriate gift to thank my neighbours for being so nice after a little unpleasant encounter I had.

Last week while I was walking home two guys driving a van pulled up in front of me and asked me to get in with them. And in a fairly skeevy manner too. I gave them a very firm "um no thank you" and walked off, and as they drove ahead the guy in the passenger's seat gave me a sleazy grin and a wave. It was all very creepy, and as I was walking home, Kate (the lady who lives next door) was out in the garden and I told her what happened. She was very disturbed on my behalf and said I was free to come over if I wanted to. I got home, called the police, settled everything...but after they left I was pretty creeped out and not in the mood to be alone. So I went next door and Kate and David (her husband) were lovely. They offered to put me up for the night so I wouldn't be sleeping alone and I accepted.

Prove prove prove!
I was extremely grateful and wanted something nice to thank them. This chocolate and hazlenut krantz loaf really fit the bill.

This loaf is one of the three babka recipes listed in the book. And guys...it's beautiful.

You don't even understand. This is Cinnabon on crack. This is grown up nutella on toast. This is moist, buttery, cinnamony, chocolatey, nutty, chewy, soft heaven. It is rich. It is lush.

It might induce a sugar headache. Be sensible. Eat small slices.

Now...a quick side note. The posts that I do on the Honey&Co. baking book will not include corresponding recipes. They'll be more of...recipe reviews. How I found making the thing... any drawbacks or kinks... and tips I found helped me. Reason being, I don't feel very comfortable posting recipes from cook books. If (by some miracle) Sarit and Itamar read this post and say "Yeah, sure, go ahead, share our recipes", then I absolutely will because this is a recipe worth sharing. But till then, it's just going to be my experience baking the thing.

We cool?
Cool.


This was an amazing recipe to follow from start to finish. However, I will say one of the drawbacks right off the cuff is that it is time consuming. But not a bad sort of time consuming. There isn't hours and hours of intense labour, just a lot of waiting time in between. For starters, after making the dough you have to let it rest for atleast 6 hours in the fridge. Bottom line, plan ahead with this one. You will have to start the day before you want to eat it.

There is a basic babka dough recipe that Sarit and Itamar use, that is then filled and molded to make the various buns. This dough is very easy to work with. Like...EXTREMELY easy. I have made a lot of bread, from a lot of different recipes. There have been times where I have kneaded a 'dough' for 3 hours to have nothing but gloop on my counter. There was one time that the 'dough' I was working on was so tough, that by the time it was properly kneaded my wrist was sprained and stayed swollen for a week after.

This isn't at all the case here. Maybe because it's so intense on the butter, this dough comes together like a dream. All you need is about 5 minutes of kneading before you get a smooth elastic ball of putty in your hands. ALSO your hands come out super soft. I am not even kidding, your skin becomes a kind of soft no moisturizer will achieve. I could wax lyrical all day, but bottom line is that this is a beautiful, beautiful, beautiful dough to work with. Don't be scared, just get in there.
Rolled out and filled
I made the dough the night before, then had a nice lie in before waking up to make the filling. More butter goes into this, along with very dark chocolate, some ground cinnamon and a fair bit of sugar. Now, because I used granulated instead of caster sugar the filling came out quite grainy. Personally I liked it, cause it added a sugary crunch along with the nuts. You then roast a handful of hazelnuts and roughly chop them up to be sprinkled on top of the filling.

Sarit and Itamar tell you to leave the dough in the fridge till the last possible minute and I can see why. While it doesn't rise much (which I'm guessing happens because the dough uses all milk and no water), it's also very soft from all the butter. I would not be able to roll this out back home. Not without putting the slab in the freezer every 2 minutes, or working in an air conditioned room. You may think you won't be able to roll out the 50cm x 30cm rectangle specified. Don't worry, you will. Just keep at it. Again it's a very easy dough to work with, but just needs a little patience to be rolled out that thin. The amount of filling specified is perfect. You then sprinkle the hazelnuts over, roll up, then put it back in the fridge for 10 minutes before shaping.

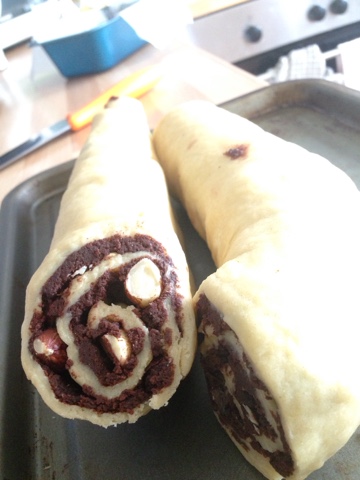
Split in half to twist
It's a little fiddly splitting the log in half and twisting it, but don't worry. YOU are the boss of this dough. Just be firm, and pat any loose filling back into place.

This is the point where you leave it to prove for two hours....and I forgot about it. :p I wandered off to do some cleaning and came back about 3 hours later. Again, don't be surprised if it hasn't proved up alot. It will still feel soft and fluffy to the touch. Bake it and I CANNOT STRESS THIS ENOUGH.
USE
THE
SUGAR
SYRUP

Guys do it. don't worry about the loaf having too much sugar in it. Again, just have a small slice. The syrup makes this so so SO moist and gives it a lovely shine...just do it, ok? Promise me you'll do it.
Do it.

So yes, I don't have to tell you anything else about this loaf, I'll let the pictures do the rest of the talking. Please. Please. I'm begging you. Buy the book. Make this babka.

BOOM

Well done Honey&Co.

Tuesday, 21 July 2015

Dried Rose Petals... and the time I plucked all the roses in my garden.

What is in the soil here?? This rose was the size of my hand!!

So... I've been known to do some pretty out there things in the name of food. I once went to Dundee with John only to have his eyes bug out at the 1kg of fresh garlic I was bringing back from the Asian supermarket to make my own garlic paste. I haven't done that in a while, there were days when my fellow biology classmates could smell me coming from a mile away so it seemed like a good idea to stop.

Since buying the Honey & Co.Baking book I have been obsessed. I've gone through it atleast once a day,lovingly stroking the pages in a mildly disturbing yet eerily accurate Gollum-esq manner. I've been a kid in a candy store, scrambling to figure out what to try first. There aren't too many crazy ingredients featured in the book, yet living on a student budget you have to be prudent about spending on exotic ingredients. I shopped around for ages before buying some rose water and orange blossom water, scouring the internet to save as much as I could. I've just finished shelling a bag of pistachios by hand cause it worked out a little cheaper than ready shelled nuts (next time I won't bother, turns out the shells make up half the weight of the bag so you get a lot less anyways =.=;). In a mildly thrifty haze I was looking up the price of rose petals online when it suddenly hit me... YOU have roses in the garden, Mallini.

Ok...so I didn't actually plant them. But it seems a shame to waste if all they're going to do is look pretty till they fall off and die, no? Might as well put them to good use!

So I plucked 3 of the largest blooms there were, and got to drying them. I have to say it is a mildly tedious process to save £1.99, but if you have a bit of time and Mock the Week playing in the background it can be a pleasant experience.

Rose petals laid out to dry.


A couple of tips, don't use any petals that have turned/ are turning brown because that will cause your final product to be completely brown as well. If it just has one or two brown spots, it is worth just tearing those bits off. You want to submerge the petals in a tray of water, just to clean off any nasties that may be on them. Even after doing that you'll still have to pay attention and look out for the tiny mites that wander around. You don't want those ending up in your cooking. Finally, dry the petals by patting them with some kitchen towel first before laying them out to dry. If you lay them out damp, there's a good chance they won't dry out properly and will just go moldy. Lay the petals out on clingfilm covered trays so that they have some space between them, and leave them in an airy place that has plenty of indirect sunlight. I put the trays in our conservatory and turned on the dehumidifier to help dry them out faster.

My petals took about 2 days to dry completely, thanks to the dehumidifier. Don't be tempted to store them away before they're completely dried out and crispy, or else the petals will just go moldy later on.

And that's it! It really was amazing that these shrank to about 1/4 of their original size. They smell quite faint...not so much like roses but like grass. :-/ I don't know if that's because they had to dry for such a long time, or if the commercially dried ones are further perfumed as part of the process. The colour of the petals do intensify upon drying, and they're going to add lovely pops of colour to whatever you put them in. So now I've now got a small jar full of dried rose petals to play around with! Stay tuned, it won't be long till they're used!

All those petals into one wee jar...


Friday, 2 May 2014

Sago Pudding with Strawberries and Coconut Cream...and the time I made dessert on the fly.


Revision week is upon us, and as usual all I can do is watch Anthony Bourdain wax lyrical about the food I have left behind. I really need to force myself to start thinking about Comp Phys and Psychology instead of Nirwana Maju banana leaf...but I'll just watch one more curry laksa video...just ONE more..

Anyways, before the sadness of revision week set in I had two lovely people come over for dinner. Ben and Jen helped me so much during Flavours of Malaysia and were such an integral part of the night. Problem is Flavours turned out to be a bigger success than we expected it to be, and because Ben and Jen were helping two of our volunteers by the time they got to the hall all the food was gone. That dinner was my way of saying thank you for being there every step of the way, especially when it came to bargaining for ingredients in Dundee.


I'd already decided on a chicken rendang and briyani for the main meal, but dessert was proving to be a challenge. Sago Gula Melaka would've been the perfect end to such a heavy meal, but I was a little low on the sago front. Making a cake would've been too involved, and also very heavy. It got to the point where I was almost resigned to sending them home without dessert when one of those beautiful flashes of inspiration hit me in the face. I had strawberries.

So, this Strawberry Sago dessert was born and by God did it go down well. Not too sweet and very refreshing it was almost a... Malaysian take of strawberries and cream if you will. To keep it nice and chilled we use frozen berries instead of ice cubes so the whole thing doesn't get watered down. It also adds a very nice texture, and if you use clear bowls you'll get to see the ruby red crumble peaking out between layers of smooth smooth coconut cream and sago. I have to say though, you could probably do this with any berries. The key to making this dessert lies in using pandan leaves. Without them the sago loses some sparkle and the coconut cream is not half as fragrant. Any Asian supermarket should carry them, or if you plan ahead, I'm fairly sure you can get them from Amazon.


Ben was nice enough to come by a little early to take all these beautiful photographs you see today. He and Jen came bearing a veggie and pork stir fry and some dim sum. And believe you me, we FEASTED.


Strawberry Sago
Serves 4

+ 1 punnet strawberries
+ 1/4 cup sago pearls (the small ones)
+ 1/2 can thick coconut milk (about 200ml)
+ 3 pandan leaves
+ 1/4 cup sugar
+ 1/4 cup water
+ The juice of 1/2 a lime
+ salt

~ Wash the strawberries and hull them. Choose 4 of the prettiest ones and set aside for garnishing. Cut the rest up into smaller pieces, wrap in foil and freeze for at least 2 hours. 


~ Wash the sago pearls and soak them for 30 minutes. Place in a saucepan with a pinch of salt, 2 knotted pandan leaves, and plenty of water, then boil till translucent. Strain, then pour into a lightly oiled container and place in the fridge to set and chill.

~ Don't forget to stir the can of coconut milk before pouring out! The really thick cream would have floated to the top and set. Pour the coconut milk into a saucepan with the remaining pandan leaf knotted up and a pinch of salt. Set on a low heat. Be careful here guys... coconut milk is very prone to separating on high heat. You want that in a rendang, but not a dessert. Heat the milk till steam starts to rise off the top, then immediately take off the heat and allow the pandan to really infuse it's scent and flavour. Pour into a jug, keep the pandan leaf in there and set in the fridge to really chill.

~ Melt the water and sugar together to make a simple syrup. When all the sugar has dissolved, take off the heat and squeeze in the fresh lime juice. You shouldn't add it at the beginning because lime juice can get bitter when it's been heated too high. Once again, when cool to touch place in the fridge to completely chill.


~ Now, when you're ready to serve take the strawberries out of the freezer and mince em' up in a food processor with a little bit of the lime syrup. Remove the pandan leaf from the coconut milk, and mix in your chilled sago. Layer the dessert up, starting with the frozen strawberry mixture, then the coconut-sago mix. You should have 4 layers, ending with a coconut-sago layer. Garnish with the strawberries you set aside earlier and a drizzle of the lime syrup. Serve up more on the side for those guests with a sweet tooth (I'm looking at you, Ben :p)

And that's that! Good luck for finals week everyone. Don't forget to treat yourself and be kind to your body. It'll be summer soon!!


Monday, 17 March 2014

Lemon and Raspberry Tart...and the time I got over myself and used a store-bought pastry case.

SPRING BREAK IS HERE LADIES AND GENTLEMEN. I’m heading down south (I think?) to stay with mum’s penpal. It’s a little sad outside…very grey and gloomy. But BBC weather says that it’s going to be nice and warm in Croughton so I’m not complaining. J It’s not quite going to be a wild spring break in Cabo (Although seeing the chickens wandering around in bikinis is a pleasant thought) but I’m really excited. The last time I saw Lesley was when I first arrived in the UK, and I’ve been dying to go back to her beautiful house ever since.

Despite their protests, I’ve promised to cook for my keep which I’m really looking forward to. To be completely honest I’ve kinda lost a bit of my cooking kick this semester. Too much going on, too many deadlines… a change of scenery is just what I need to get back into gear. The train ride has given me a chance to start planning menus in my head. I know I want to do spatchcock chicken at some point and I’ve brought curry powder for an Indian night, but the rest is pretty much up in the air. Shall I do the roast pork belly again you think? Or maybe dumplings? And what about something new? Puddings? The brain in pulsing with new recipe possibilities and I’m glad. It hasn’t had a chance to do that in a while.

Speaking of cooking (not that I ever talk about anything else), Fiona decided on Saturday night to show Eli and I what a proper British roast dinner was like. On a crazy whim we got into her car for an adventure!
 (When I say ‘adventure’, I mean a chicken run to Morrisons, with a stop at Sally’s quad to steal some rosemary)


Anyways I volunteered to make a lemon raspberry tart for pudding. And this is a recipe I really wanna share because it’s so simple to throw together. It’s the sort of thing that looks very glamorous but literally takes minutes to put together on your part. And it all boils down to a little bit of cheating (i.e-using a pre-made shortcrust tart shell).

Now don’t get huffy. When your counter is covered in potato peelings, oil spills and raw chicken sometimes a pre-made crust is what pulls you back from the brink of dinner party insanity. And no one will honestly be able to tell the difference. Once you pop the shell on a baking tray, all that’s left for you to do is whisk up the fabulously lemony filling, pour it in and bake.


Lemon Rasberry Tart
-         -  One 20cm premade shortcrust pastry shell. (be careful to choose one that isn’t cracked or broken)
-          - 2 whole eggs
-          - 2 egg yolks
-          - ½ cup castor sugar
-          - ¼ cup flour
-          - The juice of 2 ½ lemons (Quick tip: rolling the uncut lemon on the counter before squeezing will give you the most juice with minimal effort)
-          - 1 small punnet of raspberries.
-          - Icing sugar and double cream to serve.


+ Preheat your oven to 180’C
+ Put the tart shell on a baking sheet with some parchment paper underneath.
+Whisk together the eggs, egg yolks, castor sugar and flour. Then add the lemon juice and mix well.
+ OK, so you’re going to want to put your pastry case in the oven and then carefully pour in the lemon filling. I poured it in first and carried the lot over, but that resulted in a good lot of the filling sloshing out of the pastry case before the tart even made it to the oven!
+ Bake for 20 minutes. There won’t be any jiggle to the filling when you take it out. Don’t worry; this is more like a lemon bar topping rather than the usual lemon curd. It will still be smooth and creamy when you cut into it.
+Let the tart cool down and transfer to a plate. Bejewel the top with raspberries and chill for atleast 2 hours.
+ Just before serving, dust with icing sugar and serve with some double cream on the side.


:3 I’ll leave you to humbly accept the fountain of compliments you receive for all the ‘hard work’ you put into dessert. Enjoy!


Sunday, 24 November 2013

Deepavali on the Causeway... and the time I was a good little Indian girl.


So last week the Malaysian society had a joint event with the Singaporean society! We had a very, very, VERY, belated Deepavali pot luck.


There was SO much food OMG. The tables were just groaning under the weight of all the dishes everyone brought along. To put things in perspective? My friend Siti roasted a MASSIVE chicken. I really wish I had gotten a photo of it sitting on the table in all it's roasted glory. And Siti's roast chicken is the most amazing thing you will ever have the privileged to taste. I was an EXTREMELY happy camper. :p

In between all the eating, we set out a couple of things for people to do. There was the Rangoli station, where people could come and spread some sand to colour in our Uni crest.
I think it's safe to say they got really into it.


It's a beauty, isn't it? SO proud of all the people who pitched in!


For my bit, I wanted to contribute some sweets (cause let's face it, it's not Deepavali without sweets!) so I got Aishah to come over, and she, Elisa and I spent our Friday night making these beauties:


Kesari
(sweet polenta cooked in milk and ghee with cashews and raisins)


Gulab Jamun
(Mini doughnuts deep fried in ghee then soaked in a cardamom syrup)


Badam Burfi
(Almond fudge, spiced with cardamom)

The Kesari and Gulab Jamun were made from packets I brought from home. The Burfi though? I made that from scratch. It's a sweet I started making last year when I spent my first Deepavali in Scotland, and continued to make for my family when I got home. Please try making it. It is the SIMPLEST thing. The only catch is you'll have to keep stirring for 45 minutes. Make it a bonding thing! Make your friends and family help stir too! Tell them your collective labour love will make the sweets taste better! 
And let's get real, that's probably true :)


Badam Burfi
~ 300g Ground Almonds
~ 1 and 1/2 cups Milk
~ 1 cup water
~ 1/3 cup sugar
~ 400g Condensed Milk
~ 2tsp Ground Cardamom
~ 1/2 cup ghee
~ yellow food colouring

~chopped pistachios and cashews to garnish

+ Ghee up a 9x13 inch baking pan.

+ Mix the almonds, milk, water, sugar, condensed milk and cardamom in a heavy bottomed saucepan. Stir continuously over a low flame. You don't have to be vigorous about this, just keep the mixture moving so it doesn't stick.

+ You'll be stirring this for a LONG time. No joke. But it'll be fun! I promise. :)

+ After about 1/2 an hour of stirring the mixture would have reduced to quite a thick paste. It may even be spitting a little. (Please be careful. No kids or pets running around the kitchen, thank you) At this point, start stirring in the ghee a dollop at a time. Allow it to incorporate into the mixture before stirring in more.

+ Keep stirring. Make pouty faces at your significant other so they'll take over stirring.

+Seriously though, that's it. Just stir over a low flame until the paste is really thick. It should be coming away from the sides of the saucepan. To test if it's ready, wet your finger and touch the surface of the paste. If it doesn't stick, it's done.

+Spread into your greased baking tray and sprinkle with the chopped nuts*. Allow to cool. Cut into bite sized pieces (as you can guess, these are very, very rich). 

*I skipped the nuts and sprayed the surface with edible silver after it had cooled.

Enjoy!

Thursday, 14 November 2013

Pancakes with a Mixed berry Compote...and the time I fed my academic-daughter-to-be.

No no no...not like that you guys!


Meet Prishaa ( hello sayang!!) My almost-academic daughter. I tentatively adopted her last year, in preperation for when I would hit 3rd year. Unfortunately she had to transfer to Royal Holloway and I lost my only child. :'( It's ok though. She'll come visit again during Raisin and I'll sneak her into the foam fight. :)

She came by for a visit last week and I had her over for breakfast to see how she was doing. Now, as her mama OF COURSE I had to make her a proper breakfast. So I woke up craving pancakes that morning and set about making them only to find that I was missing a few key ingredients.
What to do, what to do?

It's times like these you really curse DRA for not having a sundry shop nearby. Nevermind that they'd probably jack up the prices sky-high, that set-up would probably be a lot more conducive for Saturday morning breakfast moods. Unless of course you're one of those ultra-organized people who plan out their Morrison shops to allow for impulse cooking-sprees. I am NOT one of those people. At all. Hence coming back to my problem.

No milk, no buttermilk, nothing to put on the pancakes once they came off the pan. What else was a girl to do? I blearily wandered down to the DRA bistro and purchased a 'basic breakfast' (or some such drivel) and purchased a HIGHLY OVERPRICED  half cup of yogurt, frozen mixed fruit and coffee for 3 pounds.


It was all worth it though, for these pancakes. Some flour on my counter and a stolen clementine later (Thank you Elisa!! <3) Prishaa and I were sitting down to a lovely mother-daughter breakfast of 
Pancakes with a Mixed Berry and Clementine Compote.


Pancake recipe adapted and halved from Spicy Southern Kitchen

Pancakes ( makes 6, medium sized)
- 3/4 cup all-purpose flour
- 1 Tbsp sugar
- 1/2 tsp baking powder
- 1/2 tsp baking soda
- A pinch of salt
- 1/2 of a beaten egg
- 2 Tbsp butter, melted
- 1/2 cup yogurt +1/4 cup water
- 1/2 tsp vanilla extract


- vegetable oil, for cooking pancakes

+ Mix all ingredients together (except vegetable oil) and leave aside for 20 minutes.
+ Get your non-stick pan really hot. To see if it's ready, splash some water droplets on the pan. If they 'dance' (you'll see what I mean), then you're good to go.
+ Wipe the pan with some vegetable oil, spreading it around with a kitchen towel, the ladle out 1/4 cup of batter onto the pan.
+ Cook until the top looks bumpy and is covered with bubbles.
+ Flip the pancake and cook on the other side for a few minutes till nice and brown.
+ Serve up with toppings of choice. Maple syrup's nice if you want to be traditional, although nutella sounds like a decadent option as well. Of course, you could always make the SUPER EASY fruit compote below...


Mixed Fruit and Clementine Compote
- 1/2 cup frozen mixed berries
- 1 stolen (it won't taste the same if you get it through moral means) clementine
- 2 Tbsp sugar (adjust according to how sweet the berries are)
- 2 Tbsp water
- A drizzle of STOLEN honey

+ Put the berries in a pan and to it add the zest and juice of your stolen clementine. Combine with the sugar, water, and STOLEN honey.
+ Heat up the mixture till the sugar dissolves. Continue to keep on the hob and reduce till the syrup is nice and thick.
+ Spoon generously over still warm pancakes.

Happy breakfasting guys!!


Wednesday, 16 October 2013

Red Bean Pau...and the time I had colourful pigs in my steamer.


God it's been such a long week... or rather it just felt really long. Just handed in an essay earlier today and heaved a huge sigh of relief. Honestly, if I had it my way I would just cook my way through university. Can just imagine it... getting my lecturers around my kitchen table and feeding them till they agree to give me my degree.
BAH! I wish.
Still... a girl can dream... And anyways, just because I haven't been posting doesn't mean I haven't been cooking. OOoooooooohhhh no no no no. Hell, I threw a dinner party (well...ish. I had to ask my guests to bring their own cutlery. BUT STILL!) on Sunday while I should have been writing my essay...
Anyways, enough of the worky nonsense. Just rest assured that I have quite a few posts planned for here. Starting with these! Aren't they adorable??

Over the summer I discovered dim sum for the first time, And one of the first things I tried were red bean buns. In both the places I had them, they were shaped like cute little pigs! After being here for about a month, I started craving them for breakfast one day and to the amusement of my flatmates I started to make them. COMPLETELY from scratch. Including the red bean paste. To be frank though, while the process was time consuming it wasn't actually too hard to put everything together. If you're planning to make the paste, just give yourself an extra day to let the red beans soak before you plan to eat these. They were pretty good, if I do say so myself. :p Although, I would've liked the red bean filling to be a little smoother...maybe I'll borrow someone's blender next time instead of using my food processor. That, and I have a feeling I steamed them a wee bit too long, so they were a little tough. But my flatmates assured me that the bread was nice and soft, so I'm probably worrying for nothing. I did re-steam them in the morning for brekkie though, and they turned into tough little bullets. XS Not nice, at ALL. Other than that, I'm very very proud of these. You should definitely give them a go!

Red Bean Piggy Buns

Unless you're planning on using a pre-prepared filling (nutella would be really yummy...albeit not very traditional), start by making that first. I used a easy recipe I found online. The only things I did differently were to reduce the oil measurement while frying the paste to make it a little healthier, and add a pandan leaf to the pan with the bean mixture for an added aroma.

Recipe originally from here: http://chinesefood.about.com/od/dessertsfruit/r/redbeanpaste.htm
NOTE: Remember, you need an extra day before making the buns to soak the beans before cooking them.

Ingredients:

  • 2/3 cup dried red beans
  • Water for boiling
  • 1/2 cup sugar
  • 1/4 cup oil for frying

Preparation:

Wash the beans and throw out any that are damaged. Place the beans in a small to medium-sized saucepan, cover with water and soak overnight. (This helps shorten the cooking time).
  The next day, bring the beans and water to a boil. Simmer for 1 1/2 - 2 hours, until the beans have softened, adding more water as necessary. Drain.
  Process the beans in a blender until smooth. Remove from the blender, and stir in the sugar.
  Heat the oil in a wok or frying pan. Fry the beans on medium-low heat (about 4 on an electric stove) for a few minutes until they are dry, pressing them gently with the back of a spatula to form a paste. Cool and use as called for in the recipe. (Stored in a sealed container in the refrigerator, homemade sweet red bean paste will last for approximately one week). Yields approximately 1 3/4 cups.
+ When cool, divide the paste into 15 little balls. Set aside.
For the dough, I used this recipe from blogger Happy Belly. She's a fellow St. Andrews student, a friend of my academic mum's, and absolutely fabulous. I haven't quite gotten the courage to tell her I love her blog...fingers crossed she find this and all will be revealed without me having to do anything. :p I used a little less than the 150ml of water she specifies. Also, I used 7g of yeast (because that's the amount that came in the sachet) and a teaspoon of caster sugar just to make the dough slightly sweeter.
Ingredients
200g plain flour
5g active dry yeast
150ml warm water

Disolve the yeast in a bit of  the water, pour it over the flour. Mix, then slowly add the rest of the water until it comes together to form a dough. 150ml may not be correct, just make sure it's a very soft dough that doesn't stick to your hands. Knead for a couple of minutes until smooth, put in an oiled bowl, cover with a damp towel and leave it to rest for about an hour.  

Divide the dough into equal portions ( I made 16 balls of dough). You can either form into balls and have them as bread or you can flatten them and put in a scoop of a filling of your choice, then enclose it completely and roll into balls.  Pour cold water in a pot and place your steamer on top.  Line the bottom with an oiled greaseproof paper and place your buns on it.  Make sure you don't put them too close to each other.  Cover with a towel and let it rest again for about 10 minutes before removing the towel, replacing it with a lid, and turning the heat up to high.  When the water starts boiling, turn the heat down to medium and steam for a further 10-15 minutes until done. 

+ After rolling all the buns with filling in them, colour the extra ball of dough using the food colouring of your choice and mould some ears and noses to attatch to each bun. Dip a toothpick into food colouring and poke into the bun to make marks for the eyes.


Voila! Ok, ok...so it's a pretty long post. But I PROMISE, these are actually not hard at all to make. All you need is a little patience. Good luck!