Showing posts with label dessert. Show all posts

Sunday, 28 September 2014

FSC Chocolate Stout Cake...and the time I got a second chance at university.


Life is full of second chances.
It's been a little crazy lately. I didn't mean to take a break from the blog over the summer, but so many changes were taking place that I thought it'd be best to just take a step back from writing and focus on what was going on. One of the major changes that has happened is that I've had to change my degree pathway from a Bsc. Psychology, to Bsc. Biology. Well...I say 'had to' but honestly? It's working out better than I ever imagined it would.

Doing biology has been one surprise after another. The most basic one? that I actually do enjoy it. Looking back, I probably didn't hate the subject so much in first and second year. More like... I deemed it unnecessary? Because this wasn't what I planned to do with my life! I didn't plan on actually wanting to study about how bees pollinate flowers. I was supposed to be on my way to getting a psychology degree and helping children from troubled homes. I've been raised with the idea that I would choose to do something in university and that would determine the course of my entire life. Literally. Dad has been in medicine practically his whole life, starting off as a medical student and staying a doctor till this day. Mum went to nursing school, and while she's not a nurse anymore she still works in hospitals. Hell, up till about last year, she was still working in the same hospital that trained her all those years ago. At the time, doing Psychology seemed like the most sensible choice...but now I'm not so sure.

But anyways, giving Biology a second chance has been the most amazing thing that has happened to me in a while. I'm enjoying my classes, I've made new friends and rediscovered old ones and this year is really setting off with a bang. I'm not sure what this second chance in bio is going to lead to, but I hope it ends up the same way as my second chance with stout.


Dad first gave me a swig of stout when I was 16 and I ABSOLUTELY hated the stuff. Thought it was horrible and bitter...couldn't understand why anyone would like to drink it. Vowed I would never touch the stuff again. Well, I found this recipe in a cake chart being sold at the center where I did a biology field course just before classes started again this year. Saw the recipe, went meh, and left it forgotten in my bag till this week.

So I just turned in the lab report on Friday that I had to do for that course, and surprise, surprise found the cake chart I had bought in my bag. Open to the chocolate stout cake recipe. Well guess what? I'm a girl who knows a sign when she sees one. Hightailed it over to the St. Andrews Brewing Company and got myself a bottle of their oatmeal stout.

Ok...not gonna lie I haven't fallen madly in love with stout. But I'm not as repulsed by it as I was when I was 16. In fact it tasted pretty good. No where near as bitter as my first one was, very smooth and rounded. And in this cake? It works miracles. Thanks to the stout what would normally be a regular chocolate sponge becomes moist, and dense and very, very moreish. But at the same time it's light enough that you could comfortably eat a second slice without feeling too bloated.

And so I leave you with this recipe in good faith of second chances. However the cards may fall, I wish your tough decisions end like so; in acceptance, stout, and above all, chocolate.


Chocolate stout cake*
*The recipe for the cake comes by way of the Field Studies Council 70th anniversary cake chart. All proceeds from this recipe chart go towards the FSC Kids Fund, which provides financial support for groups of disadvantaged young people who would like to visit one of their centers for an FSC experience.

Cake
- 100g soft butter
- 250g dark soft brown sugar
- 2 eggs
- 150g a.p. flour
- 1/4tsp baking powder
- 1 tsp baking soda
- 50g cocoa powder
- 200ml stout

+ Preheat your oven to 180'C (160'C for a fan oven). Grease and line 2 20cm round cake tins.
+ Cream the butter and sugar together, then gradually mix in the beaten eggs.
+ Sift in the flour, baking powder, bicarb and cocoa in then fold through. Stir in the stout, and mix till well combined.
+ Divide between the two baking tins, and bake for 35 minutes, or till cake tester comes out clean from center. Allow to cool on wire rack for 10 minutes. Then unmould from baking tin and allow to cool completely.

Marscapone Cream
- 250g marscapone cheese
- 1/3 cup double cream
- 1/3 cup icing sugar.
- 1/2 punnet of raspberries
- grated chocolate
+ Beat together the cheese, double cream and icing sugar till nice and thick.

To assemble
- Put down a layer of cake and top with 2/3 of the marscapone cream. Dot the raspberries over that layer, reserving the prettiest one as a topping. Cover with the second layer of cake and pipe the remaining marscapone cream on top. Finish with a raspberry in the center, and chocolate shavings.




Monday, 17 March 2014

Lemon and Raspberry Tart...and the time I got over myself and used a store-bought pastry case.

SPRING BREAK IS HERE LADIES AND GENTLEMEN. I’m heading down south (I think?) to stay with mum’s penpal. It’s a little sad outside…very grey and gloomy. But BBC weather says that it’s going to be nice and warm in Croughton so I’m not complaining. J It’s not quite going to be a wild spring break in Cabo (Although seeing the chickens wandering around in bikinis is a pleasant thought) but I’m really excited. The last time I saw Lesley was when I first arrived in the UK, and I’ve been dying to go back to her beautiful house ever since.

Despite their protests, I’ve promised to cook for my keep which I’m really looking forward to. To be completely honest I’ve kinda lost a bit of my cooking kick this semester. Too much going on, too many deadlines… a change of scenery is just what I need to get back into gear. The train ride has given me a chance to start planning menus in my head. I know I want to do spatchcock chicken at some point and I’ve brought curry powder for an Indian night, but the rest is pretty much up in the air. Shall I do the roast pork belly again you think? Or maybe dumplings? And what about something new? Puddings? The brain in pulsing with new recipe possibilities and I’m glad. It hasn’t had a chance to do that in a while.

Speaking of cooking (not that I ever talk about anything else), Fiona decided on Saturday night to show Eli and I what a proper British roast dinner was like. On a crazy whim we got into her car for an adventure!
 (When I say ‘adventure’, I mean a chicken run to Morrisons, with a stop at Sally’s quad to steal some rosemary)


Anyways I volunteered to make a lemon raspberry tart for pudding. And this is a recipe I really wanna share because it’s so simple to throw together. It’s the sort of thing that looks very glamorous but literally takes minutes to put together on your part. And it all boils down to a little bit of cheating (i.e-using a pre-made shortcrust tart shell).

Now don’t get huffy. When your counter is covered in potato peelings, oil spills and raw chicken sometimes a pre-made crust is what pulls you back from the brink of dinner party insanity. And no one will honestly be able to tell the difference. Once you pop the shell on a baking tray, all that’s left for you to do is whisk up the fabulously lemony filling, pour it in and bake.


Lemon Rasberry Tart
-         -  One 20cm premade shortcrust pastry shell. (be careful to choose one that isn’t cracked or broken)
-          - 2 whole eggs
-          - 2 egg yolks
-          - ½ cup castor sugar
-          - ¼ cup flour
-          - The juice of 2 ½ lemons (Quick tip: rolling the uncut lemon on the counter before squeezing will give you the most juice with minimal effort)
-          - 1 small punnet of raspberries.
-          - Icing sugar and double cream to serve.


+ Preheat your oven to 180’C
+ Put the tart shell on a baking sheet with some parchment paper underneath.
+Whisk together the eggs, egg yolks, castor sugar and flour. Then add the lemon juice and mix well.
+ OK, so you’re going to want to put your pastry case in the oven and then carefully pour in the lemon filling. I poured it in first and carried the lot over, but that resulted in a good lot of the filling sloshing out of the pastry case before the tart even made it to the oven!
+ Bake for 20 minutes. There won’t be any jiggle to the filling when you take it out. Don’t worry; this is more like a lemon bar topping rather than the usual lemon curd. It will still be smooth and creamy when you cut into it.
+Let the tart cool down and transfer to a plate. Bejewel the top with raspberries and chill for atleast 2 hours.
+ Just before serving, dust with icing sugar and serve with some double cream on the side.


:3 I’ll leave you to humbly accept the fountain of compliments you receive for all the ‘hard work’ you put into dessert. Enjoy!


Wednesday, 12 March 2014

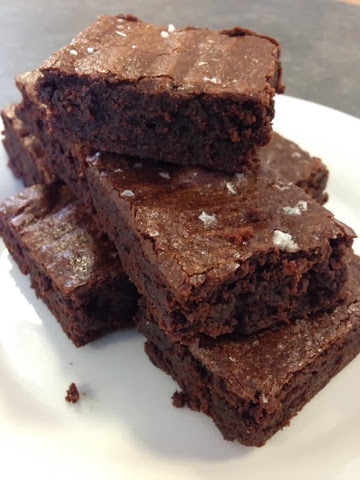
Alice Medrich's Cocoa Brownies


I'm really picky about my brownies. To me, a good brownie starts with the way it looks. Specifically that beautiful, crackly tissue paper crust. You know what I'm talking about right? That light, flaky top that all great brownies seem to have. Then when you bite into it, it shouldn't be cakey or gooey. No, a good brownie hits that golden sweet spot of FUDGY and it tastes of CHOCOLATE. Not a flat, vaguely cocoa-ish taste that disappears into a sugary abyss 2 seconds after you bite down. No. A superior brownie will punch you in the face with an intense, deep, dark chocolate high that'll swirl around your entire mouth till you basically see nothing but chocolate.


Having said that, I can't make a good brownie.
Don't get me wrong, I've tried over and over.
But brownies have always been a problem for me. I know they're supposed to be one of the first things you learn how to make, but I've never found a recipe that's been able to co-operate. Somehow it always ends up either dry or undercooked. Most times straight up burnt. NEVER with the Holy Grail of 'beautiful crust'. Maybe I'm being over-critical but I've just never been happy with how my brownies turn out.

So I'm still on my brownie quest. Maybe not quite with the determination and vengeance that I started off with, but I do try. It was on one of these brownie quirks that I tried making Alice Medrich's cocoa brownies. I've seen so much about them over the years online, but always passed them over as potential flops. I mean... a brownie recipe with no chocolate? Madness! Then one fateful evening a brownie craving arose and I didn't have any dark chocolate in my cupboard nor was I willing to walk 40 minutes to get some. I really wish now that moment had come sooner. Alice's brownies are brilliant. They've got that perfect fudgy texture and chocolatey flavour. I added a sprinkling of Maldon sea salt over the top and that did it for me. My only criticism was that I didn't get that crowning tissue paper crackle. Although, that could've been something I did wrong. Any ideas? Comment below if you know the secret to that beautiful top!


Alice Medrich's Cocoa Brownies

- 10 tablespoons (1 1/4 sticks) unsalted butter
- 1 1/4 cup sugar
- 3/4 cups plus 2 tablespoons unsweetened cocoa powder (natural or Dutch-process)
- 1/4 teaspoon salt
-1/2 teaspoon pure vanilla extract
- 2 cold large eggs
- 1/2 cup all-purpose flour
- 2/3 cups walnut or pecan pieces (optional)


+ Position a rack in the lower third of the oven and preheat the oven to 325°F. Line the bottom and sides of an 8-inch square baking pan with parchment paper or foil, leaving an overhang on two opposite sides.
+ Combine the butter, sugar, cocoa, and salt in a medium heatproof bowl and set the bowl in a wide skillet of barely simmering water (I just used the microwave. Blast for 30 seconds and stir. Repeat till smooth). Stir from time to time until the butter is melted and the mixture is smooth and hot enough that you want to remove your finger fairly quickly after dipping it in to test. Remove the bowl from the skillet and set aside briefly until the mixture is only warm, not hot.
+ Stir in the vanilla with a wooden spoon. Add the eggs one at a time, stirring vigorously after each one.
+ When the batter looks thick, shiny, and well blended, add the flour and stir until you cannot see it any longer, then beat vigorously for 40 strokes with the wooden spoon or a rubber spatula. Stir in the nuts, if using. Spread evenly in the lined pan.
+ Bake until a toothpick plunged into the center emerges slightly moist with batter, 20 to 25 minutes. Let cool completely on a rack. Lift up the ends of the parchment or foil liner, and transfer the brownies to a cutting board. Cut into 16 or 25 squares.

I'll leave you to bask in your chocolate comas. :p Till next time!

Monday, 30 December 2013

White Chocolate Apple Crumble...and the time I refused to believe 2014 was coming.


Seriously though, where DID 2013 go? It cannot have gone by so quickly. There must be something wrong with the laws of physics at play here. I absolutely POINT BLANK refuse to accept that it is only a matter of hours until we usher in 2014.

But if we must say goodbye to the year that barely begun, I am going to send it off in style. I wave adieu to 2013 with one of my new signature desserts, my take on apple crumble. I'm very very proud of this recipe. The apples are extra cinnamon-y and not too mushy, there's ALOT of crumble, and it's all very more-ish. But the thing that really pulls it together is the little bits of white chocolate nestled in the crumble. The chunks on top caramelize beautifully and give the whole thing a slightly nutty flavour, while the chunks underneath just ooze and meld the tender apples with the buttery topping.

Please try this, do. It's super simple, I promise!


White Chocolate Apple Crumble

Filling
~ 4 large granny smith apples; peeled, cored and sliced into small chunks.
~ 2 1/2 tsp ground cinnamon
~ 2 Tbsp brown sugar
~ 1 tsp honey
~1 1/2 Tbsp cornstarch

Crumble
~ 1/2 cup butter
~ 1 cup rolled oats, ground fine in a food processor.
~ 1/3 cup sugar
~ 1 cup flour
~ 1/2 cup cashew nuts, chopped up into wee chunks
~ 100g white chocolate, broken up into small chunks as well (you could use white chocolate chips)

You will need an ungreased 8x8 inch baking pan

+ Preheat your oven to 160'C.
+ Mix all the ingredients together for the filling and set aside while you get on with the crumble.
+ In a seperate bowl, rub the butter into the oats, flour and sugar. When it feels like damp sand, mix in the cashew and chocolate chunks.


+ spread your apple filling into the bottom of your baking pan and top with crumble. Like I said, there is ALOT of crumble. This is nice. This is GOOD.
+ Bake in preheated oven for 30 minutes, periodically turning the pan if it looks like the chocolate chunks are burning too quickly.
+ At the end of 30 minutes, take the pan out and cover it with tin foil. Pierce the top of the foil so that steam from the apples can escape.


+ Turn your oven up to 180'C and bake for a further 20 minutes.
+ Dish up with warm custard, or (my favourite) cold, cold, vanilla ice cream.

And on that sweet note, see you guys in 2014!


Sunday, 24 November 2013

Deepavali on the Causeway... and the time I was a good little Indian girl.


So last week the Malaysian society had a joint event with the Singaporean society! We had a very, very, VERY, belated Deepavali pot luck.


There was SO much food OMG. The tables were just groaning under the weight of all the dishes everyone brought along. To put things in perspective? My friend Siti roasted a MASSIVE chicken. I really wish I had gotten a photo of it sitting on the table in all it's roasted glory. And Siti's roast chicken is the most amazing thing you will ever have the privileged to taste. I was an EXTREMELY happy camper. :p

In between all the eating, we set out a couple of things for people to do. There was the Rangoli station, where people could come and spread some sand to colour in our Uni crest.
I think it's safe to say they got really into it.


It's a beauty, isn't it? SO proud of all the people who pitched in!


For my bit, I wanted to contribute some sweets (cause let's face it, it's not Deepavali without sweets!) so I got Aishah to come over, and she, Elisa and I spent our Friday night making these beauties:


Kesari
(sweet polenta cooked in milk and ghee with cashews and raisins)


Gulab Jamun
(Mini doughnuts deep fried in ghee then soaked in a cardamom syrup)


Badam Burfi
(Almond fudge, spiced with cardamom)

The Kesari and Gulab Jamun were made from packets I brought from home. The Burfi though? I made that from scratch. It's a sweet I started making last year when I spent my first Deepavali in Scotland, and continued to make for my family when I got home. Please try making it. It is the SIMPLEST thing. The only catch is you'll have to keep stirring for 45 minutes. Make it a bonding thing! Make your friends and family help stir too! Tell them your collective labour love will make the sweets taste better! 
And let's get real, that's probably true :)


Badam Burfi
~ 300g Ground Almonds
~ 1 and 1/2 cups Milk
~ 1 cup water
~ 1/3 cup sugar
~ 400g Condensed Milk
~ 2tsp Ground Cardamom
~ 1/2 cup ghee
~ yellow food colouring

~chopped pistachios and cashews to garnish

+ Ghee up a 9x13 inch baking pan.

+ Mix the almonds, milk, water, sugar, condensed milk and cardamom in a heavy bottomed saucepan. Stir continuously over a low flame. You don't have to be vigorous about this, just keep the mixture moving so it doesn't stick.

+ You'll be stirring this for a LONG time. No joke. But it'll be fun! I promise. :)

+ After about 1/2 an hour of stirring the mixture would have reduced to quite a thick paste. It may even be spitting a little. (Please be careful. No kids or pets running around the kitchen, thank you) At this point, start stirring in the ghee a dollop at a time. Allow it to incorporate into the mixture before stirring in more.

+ Keep stirring. Make pouty faces at your significant other so they'll take over stirring.

+Seriously though, that's it. Just stir over a low flame until the paste is really thick. It should be coming away from the sides of the saucepan. To test if it's ready, wet your finger and touch the surface of the paste. If it doesn't stick, it's done.

+Spread into your greased baking tray and sprinkle with the chopped nuts*. Allow to cool. Cut into bite sized pieces (as you can guess, these are very, very rich). 

*I skipped the nuts and sprayed the surface with edible silver after it had cooled.

Enjoy!

Monday, 21 October 2013

Nutella Mille Crepe...and the time my kitchen was hijacked.


Look at those satisfied ( and slightly disturbed) faces! Everyone, meet Hannah, John, and Charlotte. They invaded my flat the other day for crepes and chocolate. Let it never be said that I don't deliver on feeding my guests. ;)

So I was going to make a mille crepe for John to 'apologize' for 'tormenting' him with pictures of food that he couldn't eat. But they finished with their bio practical a little earlier than expected, so I told them to guzzle the first batch of crepes with the chocolate filling before assembling them properly. After they left I made another half batch and came up with this:


11 crepes, stacked one on top of the other with dark chocolate and Nutella ganache sandwiching them. :) a wholly successful experiment.

Mille crepe
The crepes were made from this recipe from grabandgorecipes.com

Crepe

Ingredients:
4 eggs
2 cups of all purpose flour
3 cups of milk
1/3 cup of sugar or to taste
5 Tbsp. melted butter
Pinch of salt
 
Direction:
Whisk together milk, eggs, sugar and salt.  Slowly whisk  in flour until smooth.
Add melted butter and mix well.
The batter should be smooth and thin.
Lightly brush the medium 8″sauté pan with butter and head over medium heat.
Working quickly- pour in about 1/4 cup of batter, tilting the pan so the batter makes a circle and coats the bottom.


The crepes should be very thin.  Cook the crepe until the bottom is light brown. Loosen with a spatula, flip and cook the other side; remove to the flat platter.


Crepe, DONE. 

Next, make the filling. 
Dark Chocolate and Nutella Ganache
Ingredients:
150ml double cream
100g dark chocolate
2 heaped tbsp Nutella 

Put everything into a small pot and heat gently on the stove. Stir everyone in a while till nice and smooth. 

To assemble:

Start with a crepe on your plate and dab on 1 1/2 tbsp of filling. Smooth it out as best you can and then top with another crepe. Continue till you you are crepe-less. Mind you, this'll be tricky. The stack gets crazy wobbly the higher you get. If you really can't work with it, stick it in the fridge for 1/2 an hour to harden before you continue. When you get to your last crepe, dust with cocoa powder and have a shot of vodka to celebrate your success. 


Happy eating guys!