Friday, 7 August 2015

The Honey & Co. Baking Book - Chocolate and Hazlenut Krantz Loaf


I AM NOW 23
Chocolate and Hazelnut krantz loaf
When did this happen? I have no idea. I woke up and I was 23 and now I need to look up how to pay taxes and buy houses. This is terrifying. I am....ADULTING.

Naturally the only reasonable response to this is to not acknowledge it's happening. So I'm just going to retreat into the kitchen and not give any notice to this strange maturation process. Come get me when I'm 99 and in need of an old folks home where once again I won't have to make my own decisions, and will instead allow people to push me along in a wheelchair while I mumble over recipe books.

Speaking of recipe books, a HUGE shoutout to everyone who got me a cooking related item (which was basically all of you) as a birthday gift. I am now in possession of a teal soup ladle that's been modeled after Nessie, the Great British Bake-Off cook book, a cook book by Mary Berry, a multipurpose grinder to make curry pastes and powders, and a truly fantastic cleaver. You all know me so well, thank you so very much.

Anyways! Today's post is the first recipe review of the Honey&Co. Baking book. The first of many I assure you. Every single dish in that book is screaming to be made and I can barely wait to try them all. I started with this one, because I was looking for an appropriate gift to thank my neighbours for being so nice after a little unpleasant encounter I had.

Last week while I was walking home two guys driving a van pulled up in front of me and asked me to get in with them. And in a fairly skeevy manner too. I gave them a very firm "um no thank you" and walked off, and as they drove ahead the guy in the passenger's seat gave me a sleazy grin and a wave. It was all very creepy, and as I was walking home, Kate (the lady who lives next door) was out in the garden and I told her what happened. She was very disturbed on my behalf and said I was free to come over if I wanted to. I got home, called the police, settled everything...but after they left I was pretty creeped out and not in the mood to be alone. So I went next door and Kate and David (her husband) were lovely. They offered to put me up for the night so I wouldn't be sleeping alone and I accepted.

Prove prove prove!
I was extremely grateful and wanted something nice to thank them. This chocolate and hazlenut krantz loaf really fit the bill.

This loaf is one of the three babka recipes listed in the book. And guys...it's beautiful.

You don't even understand. This is Cinnabon on crack. This is grown up nutella on toast. This is moist, buttery, cinnamony, chocolatey, nutty, chewy, soft heaven. It is rich. It is lush.

It might induce a sugar headache. Be sensible. Eat small slices.

Now...a quick side note. The posts that I do on the Honey&Co. baking book will not include corresponding recipes. They'll be more of...recipe reviews. How I found making the thing... any drawbacks or kinks... and tips I found helped me. Reason being, I don't feel very comfortable posting recipes from cook books. If (by some miracle) Sarit and Itamar read this post and say "Yeah, sure, go ahead, share our recipes", then I absolutely will because this is a recipe worth sharing. But till then, it's just going to be my experience baking the thing.

We cool?
Cool.


This was an amazing recipe to follow from start to finish. However, I will say one of the drawbacks right off the cuff is that it is time consuming. But not a bad sort of time consuming. There isn't hours and hours of intense labour, just a lot of waiting time in between. For starters, after making the dough you have to let it rest for atleast 6 hours in the fridge. Bottom line, plan ahead with this one. You will have to start the day before you want to eat it.

There is a basic babka dough recipe that Sarit and Itamar use, that is then filled and molded to make the various buns. This dough is very easy to work with. Like...EXTREMELY easy. I have made a lot of bread, from a lot of different recipes. There have been times where I have kneaded a 'dough' for 3 hours to have nothing but gloop on my counter. There was one time that the 'dough' I was working on was so tough, that by the time it was properly kneaded my wrist was sprained and stayed swollen for a week after.

This isn't at all the case here. Maybe because it's so intense on the butter, this dough comes together like a dream. All you need is about 5 minutes of kneading before you get a smooth elastic ball of putty in your hands. ALSO your hands come out super soft. I am not even kidding, your skin becomes a kind of soft no moisturizer will achieve. I could wax lyrical all day, but bottom line is that this is a beautiful, beautiful, beautiful dough to work with. Don't be scared, just get in there.

Rolled out and filled
I made the dough the night before, then had a nice lie in before waking up to make the filling. More butter goes into this, along with very dark chocolate, some ground cinnamon and a fair bit of sugar. Now, because I used granulated instead of caster sugar the filling came out quite grainy. Personally I liked it, cause it added a sugary crunch along with the nuts. You then roast a handful of hazelnuts and roughly chop them up to be sprinkled on top of the filling.

Sarit and Itamar tell you to leave the dough in the fridge till the last possible minute and I can see why. While it doesn't rise much (which I'm guessing happens because the dough uses all milk and no water), it's also very soft from all the butter. I would not be able to roll this out back home. Not without putting the slab in the freezer every 2 minutes, or working in an air conditioned room. You may think you won't be able to roll out the 50cm x 30cm rectangle specified. Don't worry, you will. Just keep at it. Again it's a very easy dough to work with, but just needs a little patience to be rolled out that thin. The amount of filling specified is perfect. You then sprinkle the hazelnuts over, roll up, then put it back in the fridge for 10 minutes before shaping.

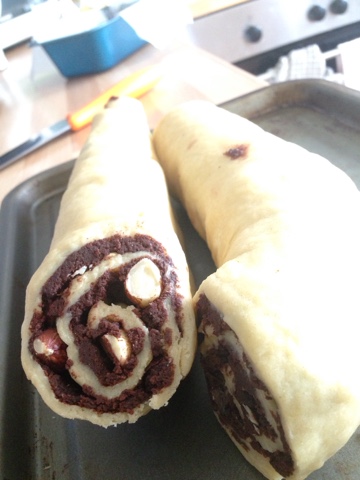
Split in half to twist
It's a little fiddly splitting the log in half and twisting it, but don't worry. YOU are the boss of this dough. Just be firm, and pat any loose filling back into place.

This is the point where you leave it to prove for two hours....and I forgot about it. :p I wandered off to do some cleaning and came back about 3 hours later. Again, don't be surprised if it hasn't proved up alot. It will still feel soft and fluffy to the touch. Bake it and I CANNOT STRESS THIS ENOUGH.
USE
THE
SUGAR
SYRUP

Guys do it. don't worry about the loaf having too much sugar in it. Again, just have a small slice. The syrup makes this so so SO moist and gives it a lovely shine...just do it, ok? Promise me you'll do it.
Do it.

So yes, I don't have to tell you anything else about this loaf, I'll let the pictures do the rest of the talking. Please. Please. I'm begging you. Buy the book. Make this babka.

BOOM

Well done Honey&Co.

Tuesday, 21 July 2015

Dried Rose Petals... and the time I plucked all the roses in my garden.

What is in the soil here?? This rose was the size of my hand!!

So... I've been known to do some pretty out there things in the name of food. I once went to Dundee with John only to have his eyes bug out at the 1kg of fresh garlic I was bringing back from the Asian supermarket to make my own garlic paste. I haven't done that in a while, there were days when my fellow biology classmates could smell me coming from a mile away so it seemed like a good idea to stop.

Since buying the Honey & Co.Baking book I have been obsessed. I've gone through it atleast once a day,lovingly stroking the pages in a mildly disturbing yet eerily accurate Gollum-esq manner. I've been a kid in a candy store, scrambling to figure out what to try first. There aren't too many crazy ingredients featured in the book, yet living on a student budget you have to be prudent about spending on exotic ingredients. I shopped around for ages before buying some rose water and orange blossom water, scouring the internet to save as much as I could. I've just finished shelling a bag of pistachios by hand cause it worked out a little cheaper than ready shelled nuts (next time I won't bother, turns out the shells make up half the weight of the bag so you get a lot less anyways =.=;). In a mildly thrifty haze I was looking up the price of rose petals online when it suddenly hit me... YOU have roses in the garden, Mallini.

Ok...so I didn't actually plant them. But it seems a shame to waste if all they're going to do is look pretty till they fall off and die, no? Might as well put them to good use!

So I plucked 3 of the largest blooms there were, and got to drying them. I have to say it is a mildly tedious process to save £1.99, but if you have a bit of time and Mock the Week playing in the background it can be a pleasant experience.

Rose petals laid out to dry.


A couple of tips, don't use any petals that have turned/ are turning brown because that will cause your final product to be completely brown as well. If it just has one or two brown spots, it is worth just tearing those bits off. You want to submerge the petals in a tray of water, just to clean off any nasties that may be on them. Even after doing that you'll still have to pay attention and look out for the tiny mites that wander around. You don't want those ending up in your cooking. Finally, dry the petals by patting them with some kitchen towel first before laying them out to dry. If you lay them out damp, there's a good chance they won't dry out properly and will just go moldy. Lay the petals out on clingfilm covered trays so that they have some space between them, and leave them in an airy place that has plenty of indirect sunlight. I put the trays in our conservatory and turned on the dehumidifier to help dry them out faster.

My petals took about 2 days to dry completely, thanks to the dehumidifier. Don't be tempted to store them away before they're completely dried out and crispy, or else the petals will just go moldy later on.

And that's it! It really was amazing that these shrank to about 1/4 of their original size. They smell quite faint...not so much like roses but like grass. :-/ I don't know if that's because they had to dry for such a long time, or if the commercially dried ones are further perfumed as part of the process. The colour of the petals do intensify upon drying, and they're going to add lovely pops of colour to whatever you put them in. So now I've now got a small jar full of dried rose petals to play around with! Stay tuned, it won't be long till they're used!

All those petals into one wee jar...


Sunday, 12 July 2015

The Honey & Co. Baking Book launch

So I went for something fantastic that I can't wait to tell you all about. 
After spending a really great week in Newcastle with Sulekha (who I am missing already :( ) I got back into the bubble yesterday just in time to freshen up and head to an event hosted by Toppings book shop on Bell street. 

Toppings has a whole host of events going on in conjunction with the Open, a massive golf tournament that's being held in St. Andrews right now. Last night, they were hosting Sarit Packer and Itamar Srulovich the power couple behind Honey & Co. a middle eastern inspired restaurant in London. Sarit and Itamar came up by train to hold a live cooking demo centered around their newly released cook book, 'Honey & Co. The Baking Book'


Chilled orange blossom and earl grey tea


Arriving just before the event was about to start, I was greeted at the door with a glass of chilled orange blossom and earl grey tea (which I would like to drink for the rest of my life thank you very much). The shop was already fairly full, and I would've had to take a seat at the back if one of the owners hadn't taken pity on my tiny Asian stature and ushered me up front. A massive tray filled with bites of buttered fruit tea loaf was already floating around the store, hinting at the many tidbits we were to be treated to that night. 


Sarit and Itamar were absolutely adorable. Clearly very much in love with their work, they showed us a few quick things they make in store; an herb frittata, sesame halva, and a fresh kanafeh. 
Cutie patooties Sarit and Itamar


Knafe.
Guys I got SO excited. This is a beautiful middle eastern dessert made by sandwiching a mix of cheeses (Sarit used feta, goats cheese and cream cheese) with two butter coated layers of a nest like phyllo dough called kadaif. You then soak the whole thing in orange blossom syrup and top it with pistachios and rose petals. It's an incredibly lush and fragrant dessert that presents so many wonderful tastes and textures to enjoy. Crispy, creamy, nutty, salty, sweet, perfumey...just AAAHHHH!!!!!! Having seen it being made I am now SO determined to whip it up myself at home.  Anyone know where I can get a hold of kadaif pastry in Scotland?

Clockwise from top right; herb frittata, chickpea shortbread, carrot walnut cake, knafe.

Throughout the night they kept bringing out trays of baked goodies that had been featured in the book. There was an incredibly moist carrot walnut cake, some really fudgy chocolate pistachio cookies, and my personal favourite a gluten free chickpea shortbread.


I bought the book the minute the cooking demo was over and got it signed by Sarit and Itamar. We had a little chat about what halva referred to in our respective cultures (When you say halva in Malaysia you're usually referring to a firm jelly-like sweet made with semolina, as opposed to the sesame fudge we were served last night). I know it sounds obvious, I mean they are chefs and all, but their love for good food was palpable and rolled off the couple in waves. This infectious enthusiasm glows from the pages of The Baking Book, with each recipe accompanied by it's own little anecdote.

When you leave home to start somewhere new, you very quickly identify pockets of familiarity to take refuge in when the 'newness' becomes too much to handle. While reading Sarit and Itamar's writing, I had the overwhelming feeling of being back in my grandmother's kitchen where she tried to teach me how to make my favourite vadai. This book, with it's bright yellow cover and beautiful photography beckons to you. It invites you to look inside, to thumb through the pages, to laugh at the stories and try the recipes within. I have never been anywhere in the middle east (YET) and I can't say I share the same cultural identity as Sarit and Itamar, but for some reason having this book feels like holding a part of home in my hands.


It won't be long before I have a crack at the recipes in this book, and I can't wait to visit Honey&Co. with my parents when we're down in London this year.

To see more about what Toppings bookstore has on, go to their events page here.

And while you're at it, you might as well check out Honey&Co. online ;)

Sunday, 21 June 2015

Butter Roasted Chicken Ragù...and one of the many times I have tried to get fancy with pasta.

Ok, ok, I am cutting it a little close...but I am still keeping to my 1 post a week promise!
This is going to be a quick one cause I need to get to work early tomorrow, but that's  pretty fitting since this recipe is fairly no-fuss.

I made this for a couple of friends who came over for dinner earlier this week. Having a couple of things to do around the house *coughbingewatchorangeisthenewblackcough* I needed to make something that didn't require me keeping a constant watch on it. This pasta sauce is great because for minimal fuss you get something that tastes like you've been stirring it for hours. Using the oven gave the sauce a depth of flavour that I have yet to achieve from my slow cooker. Anyways...without further ado!


Butter roasted chicken pasta
- 2 large red onions
- 1 bulb garlic
- 6 chicken thighs, skin and bone on
- 1 tbsp oregano
- 1 tsp ground black pepper
- 1 tsp salt
- 2 tbsp butter
- 500g tomato passata
- 1 tbsp chilli flakes
- 1 chicken stock cube
- sugar and salt to taste

- Cut the onions into rough quarters and separate garlic cloves. Scatter into baking tray and place chicken thighs skin side up on top. Season with oregano, pepper, and salt. Dot the butter on the chicken.


- Roast in a 200'C oven until chicken skin is golden brown. Pour in passata, crumble stock cube, and mix through chilli flakes. Cover the baking tray with foil, then turn oven down to 180'C and bake an additional 45 minutes. After that time, take the foil off and remove chicken from tray. While the meat rests, mash up the sauce and try to fish out as many garlic skins as you can. Debone and roughly chop the meat (This'll be super easy, the chicken will be falling off the bone), then mix back into sauce and place back in oven for an additional 15 minutes.

- Boil your pasta of choice till al dente and serve with a wedge of cheese so people may anoint their serving in cheesy goodness to their heart's content.

Have a good week people!!

Tuesday, 16 June 2015

A summer in St. Andrews


*sigh* I really need to get this posting thing down don't I? Imagine my embarrassment at discovering that the last time I posted was 6 months ago....the shock the HORROR. 

And it's not from lack of cooking! Oh no... I've been very busy in the kitchen this past semester. But you know how it is? You cook you study and next thing you know you're too tired to post anything up and the cycle just goes on and on. 

Well here's my attempt at another heave ho and I am going to try really REALLY hard to post at least once a week. Ambitious I know. :p

Well, quick update time. I'll be in St. Andrews over the summer for an internship with the School of Biology. I'm very excited to see what my Scottish summer will bring, especially food-wise!

Wednesday, 11 February 2015

Cucur Udang...and the time I thought about missing home.


My first post back in Haggis-land!
It's strange... it was very hard (harder than usual) to leave home but when I got back to the Bubble the routine came back like I never left. Walk to lectures...walk to Morrisons...do my laundry...prep meals for the week... It's funny. Being here somehow transforms me into a 'responsible' adult. :p Imagine that?

That's not to say I don't miss home though. I do, very much so. Granted, homesickness doesn't hit me as hard as it did in my first year but I still feel it every once in a while. Not surprisingly I feel it most during meal times...somehow a mushroom omelette doesn't quite compare to a good prawn curry, y'know what I mean?

Anyways, it's times like these that I'm thankful for being able to cook. If I miss something, chances are I can whip up something akin to the real thing! Granted, the flavours aren't usually spot on, but I get as close as I can. :)


One of the last things I threw together before I left were these prawn fritters. Cucur udang, as it's known back home is a very common teatime treat. More likely than not if you've grown up in Malaysia you would've had these as a snack at some point in your life.


 While most recipes use fresh prawns, these get their richness from pounded and fried dried shrimp. If you have all the ingredients on hand, they come together in a snap!


Cucur Udang
- 1/4 cup dried prawns, pounded fine
- 1/2 cup a.p flour
- 1/4 tsp ground tumeric
- 1 egg
- 1 tsp baking powder
- 1/4 cup water
- 1/2 carrot, grated
- 3-4 shallots, sliced thinly
- 1/4 cup chopped up Chinese Chives*
- 1/4 cup cabbage, sliced finely
- 1/2 red/green chilli, chopped finely. 

1. Fry the dried prawns till golden brown. 
2. Mix all the ingredients together. 
3. Heat up enough oil to shallow fry the fritters 3-4 at a time. ( a handy trick I leart in cooking class: stick a bamboo skewer into the oil. When little bubbles start streaming out around the tip, the oil is ready for frying!
4. Drop tablespoons full of the mixture into the oil, and fry turning once till golden brown. 


5. Drain on paper towels and serve hot with chilli sauce. 


HAPPY EATING!!

Thursday, 9 October 2014

Oven Roasted Tomatoes and Sausages...and the time I fell in love with produce.

In case you haven't realised by now, food makes me very happy. It's gotten worse since coming to university... my day can go from shit to glorious under 5 minutes if I find some nice strawberries or an unusual pasta. Or in this case...some beautiful tomatoes.


I mean look at them! Are they not the most beautiful vine tomatoes you've ever seen?? I normally don't even like tomatoes but I saw these sitting on display all ruby and beautiful and I just HAD to get them. And boy am I glad I did. These tasted amazing. Really sweet and..well...tomatoey? You know what I mean right? When you buy not-so-nice tomatoes and all they taste of is water? It wasn't a case at all for these. I could've eaten them raw...which I didn't.

I haven't gotten that emotional over vegetables yet. :p


This dish was something I saw on a Jamie Oliver show. It's crazy easy, and suits whether you're feeding just yourself or a crowd. Imagine if you will, taking this dish steaming out, straight from oven to table. Plonk a fresh baguette on the table and let everyone just dig in together with their hands. Or toss in some pasta and devour when it's cold and rainy outside.

Rather than give you a set recipe, I'll type out rough proportions so you can scale up or down as necessary. Unexpected guests you need to impress? You can have this on the table in 45 minutes WITHOUT slaving over a hot stove.


Oven Roasted Tomatoes and Sausages
- Enough vine tomatoes to cover the bottom of your baking dish when halved.
- 1 clove of garlic for every 2 sausages
- oregano
- salt
- sugar (if your tomatoes need a little brightening up)
- Olive oil
- 2-3 sausages per person

+ preheat oven to 190'C

+ Wash the tomatoes and halve them. Arrange them in a baking dish so they are (mostly) cut side up. Roughly chop garlic and add to baking pan. Season with oregano, salt and if needed, sugar. Drizzle a healthy dose of olive oil over the tomatoes and toss to combine. Rearrange tomatoes cut side up if necessary.


+ Prick sausages once so they don't explode in the oven. Arrange them over the top of the tomatoes. Bake for 45 minutes, turning the sausages halfway so they brown on all sides. When turning the sausages you might want to drain away some of the fat from the pan, quite a lot comes out of the sausages.

+ Enjoy with warm crusty bread or hot pasta. Or both! :)

p.s- leftovers from this are great! Imagine the pasta bake that would come out of this...